Gerrit is a code review tool built on top of Git version control system with the web based access. If you are reading this article you probably have an idea what is Gerrit, but nevertheless. It is modular and extensible as a result a lot of features provided by plugins. In this article we are covering the Replication Plugin.
Introduction
Owing to Bitbuck SSH communication changes ( disabling support for multiplexing ) replication over SSH has started to fail. I was getting the following error
1 2 | Cannot replicate to [email protected]:any/thing.git org.eclipse.jgit.errors.TransportException:
[email protected]:any/thing.git: channel is not opened
|
You can read more about the problem here. But unfortunately the solution suggested there doesn’t work and I guess not only for me. I had tried to find a solution to the problem, but ended up with setting up replication over HTTPS.
Prerequisites
This guide will cover how to set up replication from Gerrit to Bitbucket over HTTPS protocol using the Replication plugin. This plugin is the part of Core Plugins, that are packaged within the Gerrit war file. You can check whether you have the plugin installed using the web interface or the SSH remote administration tool.
1 | ssh -p 29418 yourserver.com gerrit plugin ls
|
This tutorial implies that you have a working project that you want to replicate to Bitbucket and of course Gerrit installed 🙂
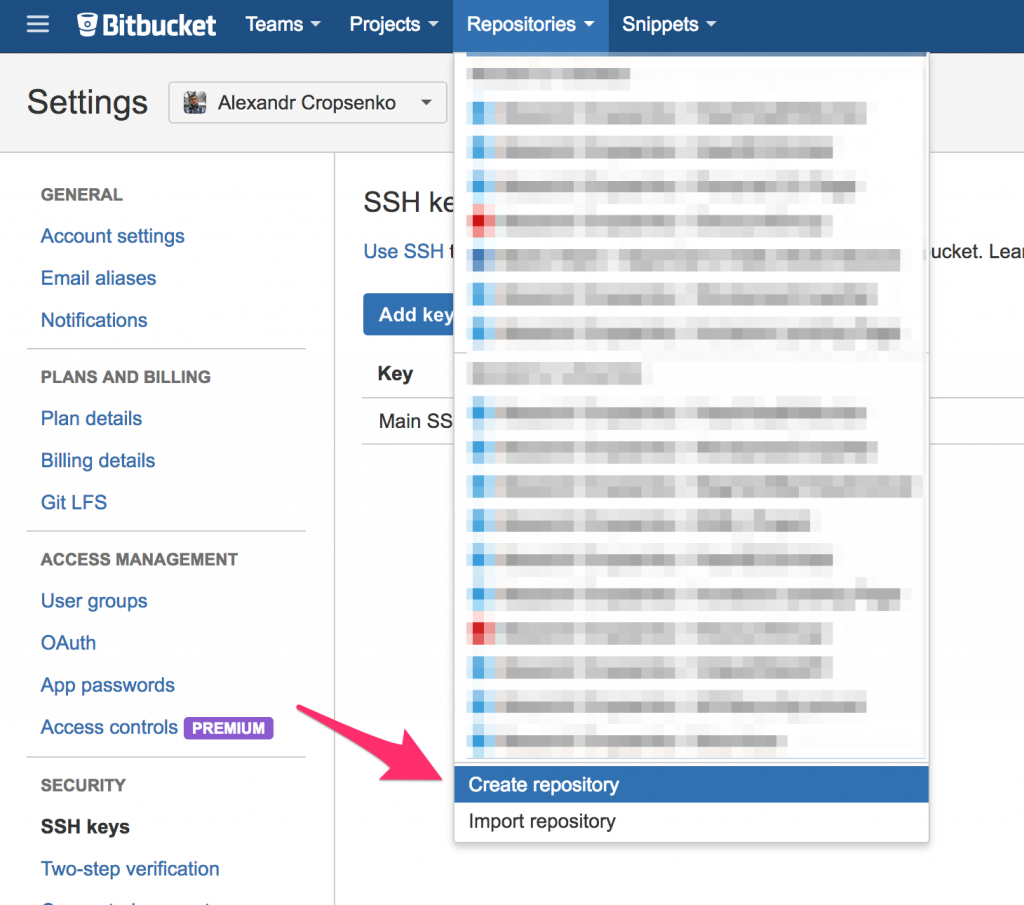
Step 1 — Access to a Bitbucket repository
Before doing anything, the first thing you need to have is a Bitbucket repository. In order to create it, log into you account and select the following menu option.
Once a repository is created, find the URL for cloning it over the HTTPS protocol at the top-right corner of the page.
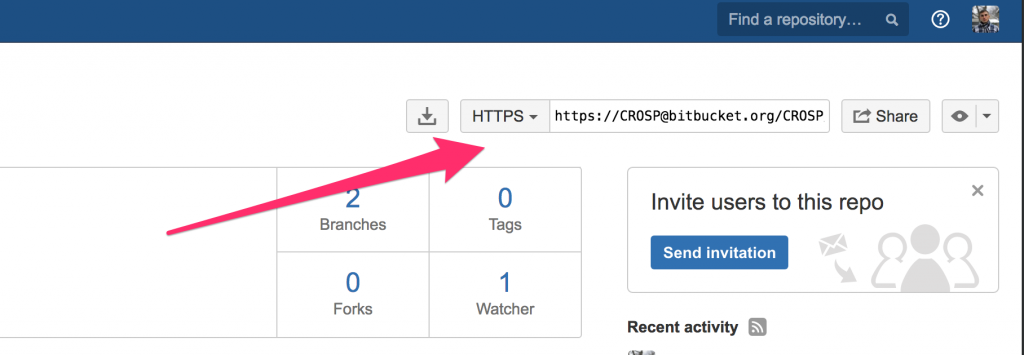
Copy the URL and log into your Gerrit server with the gerrit user using SSH, VNC or whatever tool you use to access your server. And try to clone a repository, for example :
1 | git clone https://[email protected]/CROSP/someproject.git
|
Next, enter your Bitbucket account password.
This step is required to verify whether your server is able to access and clone a repository from the Bitbucket server. If you have problems doing this, check your firewall and network settings.
If everything is fine you should get a copy of a repository in the current folder.
Step 2 — Configuring the replication plugin
Now we need to configure the replication plugin itself. This is done through the configuration file replication.config, located in the etc subdirectory of the Gerrit home directory.
Navigate to the home directory, in my case it is /opt/gerrit/etc. Create a configuration file called replication.config.
1 | gerrit@gerrit:~/etc$ vim replication.config
|
As I have already mentioned this is the main file for storing plugin settings. There are a lot of options you can set in this file, please refer to the Official Documentation Page for more details.
Here is an example of a configuration for Bitbucket replication over HTTPS.
1 2 3 4 5 6 7 8 | [remote "bitbucket"]
url = https://[email protected]/USER/${name}.git
push = +refs/tags/*:refs/tags/*
push = +refs/heads/*:refs/heads/*
mirror = true
projects = NameOfYourProject
replicateOnStartup = true
replicatePermissions = false
|
I won’t explain each option and only highlight the most important ones.
The first option is URL. You have to set this option to the url format used above for cloning the repository, replacing the repository name with the placeholder ${name} so it will be substituted with your Gerrit project name automatically.
For instance
1 | https://[email protected]/CROSP/someproject.git
|
should be
1 | https://[email protected]/CROSP/${name}.git
|
The second option is projects. A single project name, multiple projects or even regular expression can be used as a value.
Save the file and exit the editor.
Step 3 — Credentials
Credentials should be added to the file etc/secure.config. This file is used for storing credentials that are used by Gerrit and plugins. The file should be readable only by the Gerrit daemon process.
In our case we need to append the following remote credentials section :
1 2 | [remote "bitbucket"]
password = yourBitbucketPassword
|
First of all the name should be exactly the same as that you have specified in the replication.config and in this case the name is “bitbucket”.
Furthermore, you don’t need to specify your name explicitly in this file as far as it is already present in the url used for accessing Bitbucket.
Under the hood
The Replication plugin uses the JGit library extensively including authentication, so in case you have any troubles you can try to find a solution for JGit.
Step 4 — Replication
Now it is time to start replication and check whether it works. First of all you have to reload the plugin settings. You can execute the following command :
1 | ssh -p 29418 yourserver.com gerrit plugin reload replication
|
Or just restart the Gerrit service.
Next, in order to monitor the progress of replication, go to the logs directory, in my case it is /opt/gerrit/logs. In this directory you should probably see the replication plugin log file replication_log. Let’s clear it from old log messages by executing the following command:
1 | echo "" > replication_log
|
Now, open the log file in the follow mode to see all new log messages:
1 | tail -f replication_log
|
The final step is to trigger replication. You can do this by committing any changes to your repository or manually by executing the following command:
1 | ssh -p 29418 yourserver.com replication start --wait NameOfYourProject
|
Under the hood
This command above and all other ssh commands executed on port 29418 by default, are not simple UNIX commands executed in Bash. When Gerrit is being started it binds to a port and listens for remote connections. Gerrit implements it’s own SSH server using Apache Mina SSHD library. If you are interested in greater details you can refer to the source code
Now watch the log file and you should see something like that in the output:
1 2 3 4 | [2017-04-20 21:09:47,819] [] scheduling replication NameOfYourProject:..all.. => https://[email protected]/CROSP/NameOfYourProject.git
[2017-04-20 21:09:47,820] [] scheduled NameOfYourProject:..all.. => [6a13dced] push https://[email protected]/CROSP/NameOfYourProject.git to run after 15s
[2017-04-20 21:10:02,820] [6a13dced] Replication to https://[email protected]/CROSP/NameOfYourProject.git started...
[2017-04-20 21:10:03,963] [6a13dced] Replication to https://[email protected]/CROSP/NameOfYourProject.git completed in 1044ms, 15000ms delay, 0 retries
|
If the output is similar, congratulations, you have successfully set up replication. To ensure that your repository has been replicated just check in on the Bitbucket server.
Conclusion
In this tutorial, I tried to explain how to set up replication from Gerrit to Bitbucket over HTTPS protocol. This method is used since Bitbucket disabled the capability of multiplexing for SSH connections. If you have managed to configure replication using SSH, it would be great if you shared a solution.
If you have any questions or troubles please feel free to leave comments below.
Hi, my name is Molochko Alexander, I am Interested in different areas of software development, curious about learning and discussing architectural and software patterns, examining internals and understanding how everything works under the hood.
Recent posts
- Mar 1, 2020 Implementing Laravel custom Auth Guard and Provider
- Feb 16, 2019 Hacking Java Applications with Byte Buddy and Decompilers
- Jan 5, 2019 Page Specific Dynamic Angular Components using Child Routes
- Oct 13, 2018 Understanding Dagger 2 Scopes Under The Hood
- Jul 21, 2018 Understanding and using Xdebug with PHPStorm and Magento remotely
Popular posts
- 143500 Views How to Install The Latest Apache Server (httpd) on Centos 7
- 107037 Views Routing network traffic through a transparent SOCKS5 proxy using DD-WRT
- 76567 Views How to Unbrick TP-Link WiFi Router WR841ND using TFTP and Wireshark
- 75310 Views Android Reverse Engineering: Debugging Smali in Smalidea
- 62756 Views Clean Architecture : Part 2 – The Clean Architecture