Dagger 2 is a compile-time DI framework that is becoming increasingly popular in Android development. Using Dagger 2 can make application structure more scalable and maintainable. However, in this post I am not going to tell you about all benefits of using Dagger 2. This article is intended for developers that already had some experience using this framework and are eager to learn it a little bit deeper. One feature of Dagger 2 is the concept of Scope. Scopes are not easy to understand from the first time of use and require some effort to get used to them for applying them correctly in a application.
Introduction
If you are reading this article, I assume that you already have got your hands dirty playing with Dagger 2 and familiar with Component, Provider, Inject annotations and their purpose.
Before diving into the Scope mechanism, you should have a quite decent understanding of when and why the dependency injection mechanism is applied. Furthermore, I won’t describe some core theoretical concepts like a dependency graph, components and providers.
All code from the article can be found on GitHub.
The Definition of The Scope
What is a scope?
Scope – is a memory boundary that contains injectable dependency objects, with a component as an entry point, the lifetime of this memory region (dependency objects) is defined by the number or references to the scoped component.
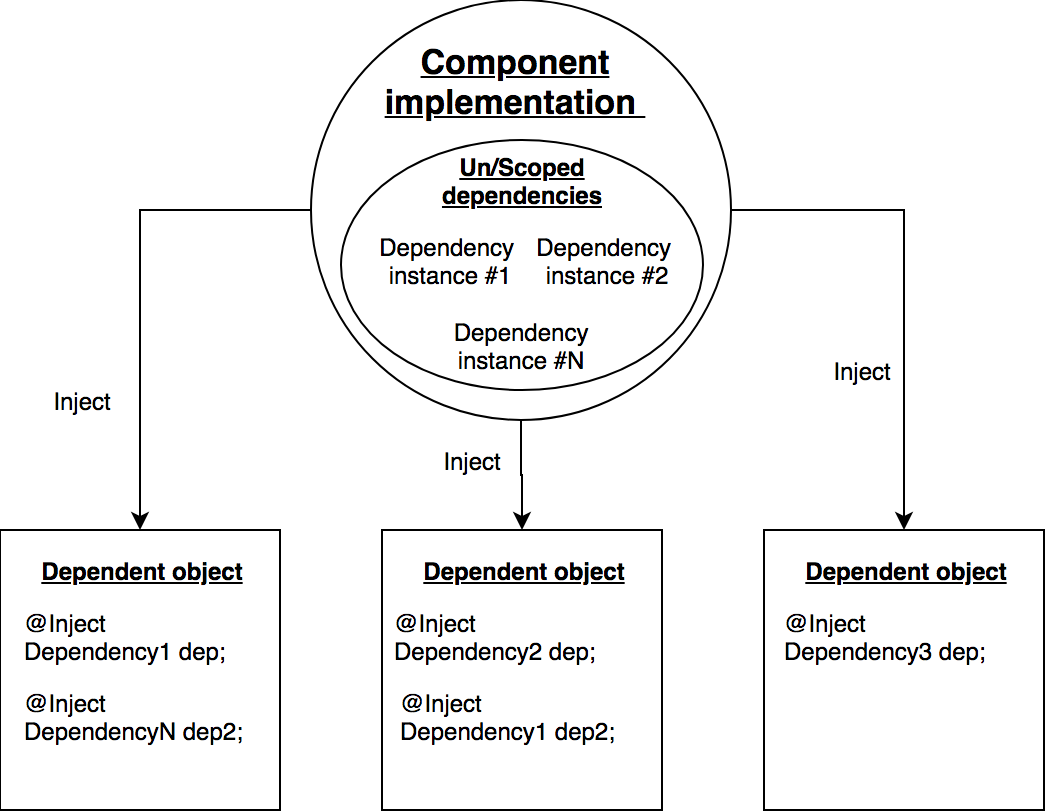
The definition above may be rough and not totally correct from some technical aspects, but I want to stress one important thing, that all objects in a scope will live as long as a Dagger component instance lives. All in all, there is nothing special about components or scopes, all usual Java/Android garbage collecting and reference counting mechanisms work here in the same way. The same instance of a scoped dependency is injected, when the same component is used.
Don’t misunderstand me, if your component is destroyed but a dependency instance is still being kept by some object, of course it won’t be destroyed, but next time you inject dependencies another instance will be provided.
Scopes are basically used during compile time for generating injectors and providers. We will see in a while how generated classes are used in runtime to maintain scoped dependencies.
A sample Project
Let’s create a really simple project for understanding the matter. I will take the liberty of violating all design best practices and principles for the sake of simplicity. (the best excuse for writing terrible code 🙂 ). I have used some boilerplate classes like BaseActivity, BaseFragment, explanation of these classes is out of scope of this article, hence you can find full code on Github.
Firstly, we need to define some scopes to have something to investigate. I have defined quite common scopes that are usually used in Android Development.
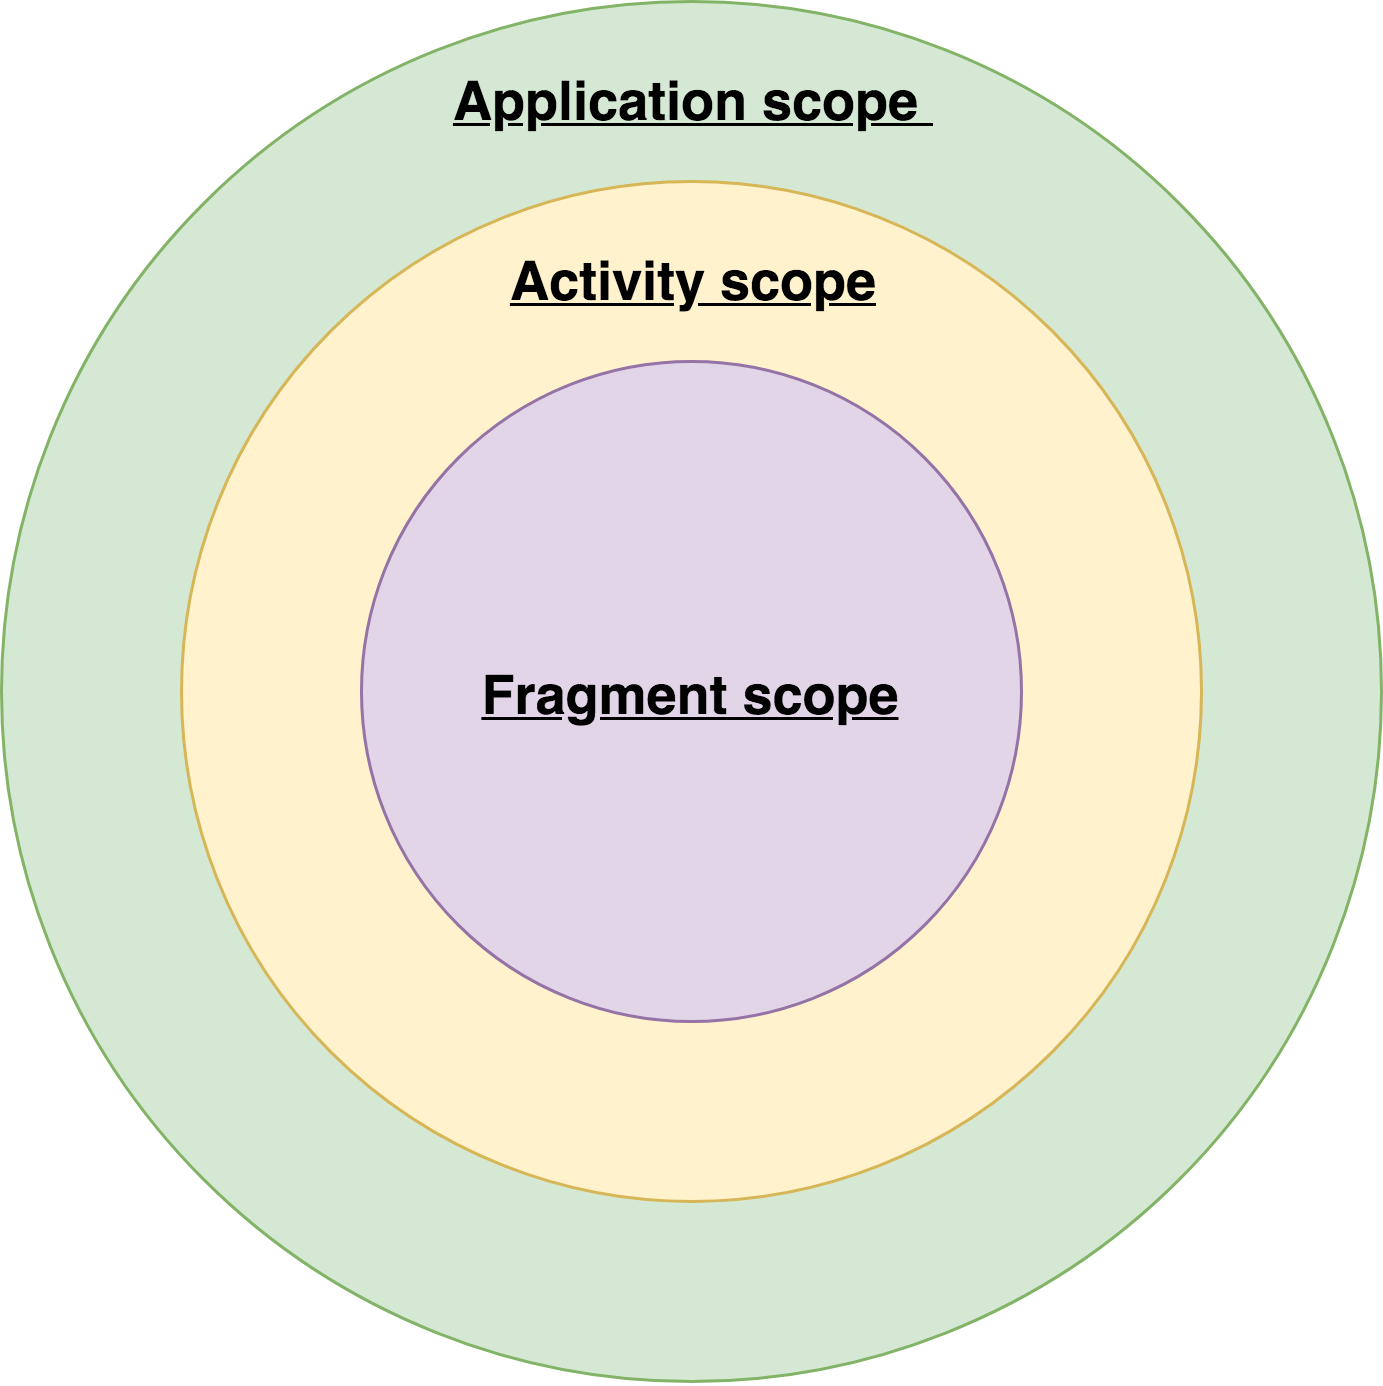
As you can see from the picture above all scopes are really tied to Android SDK classes and have respective names. Why do we usually have such scopes in android applications? Because we as developers are driven by frameworks, in that case it is Android SDK and we have not much control over the lifecycle of core system components like activities, fragments.
- Application scope – this is the most long living scope, that exists during the whole application lifetime. Components and modules within that scope usually contain Singleton/Global dependencies, like Repositories, API Services, etc.
- Activity scope – this scope, as the name suggests, lives as long as an activity does. Usually, I use this scope for a self-contained modules, a single module implements a specific case of an application. As far as the Android Activity is just a detail, it acts as a container and a router. Scoped components provide dependencies for a specific use case of an application.
- Fragment scope – the most short living scope in our case, as it is kept by a fragment. Dependencies in that scope are usually related to the presentation and UI interaction logic.
The app itself consists of two activities and four fragments. Each of activities is responsible for keeping two fragments respectively. You can switch between fragments inside a single activity or switch to another activity.
The DI component diagram represents general project structure.
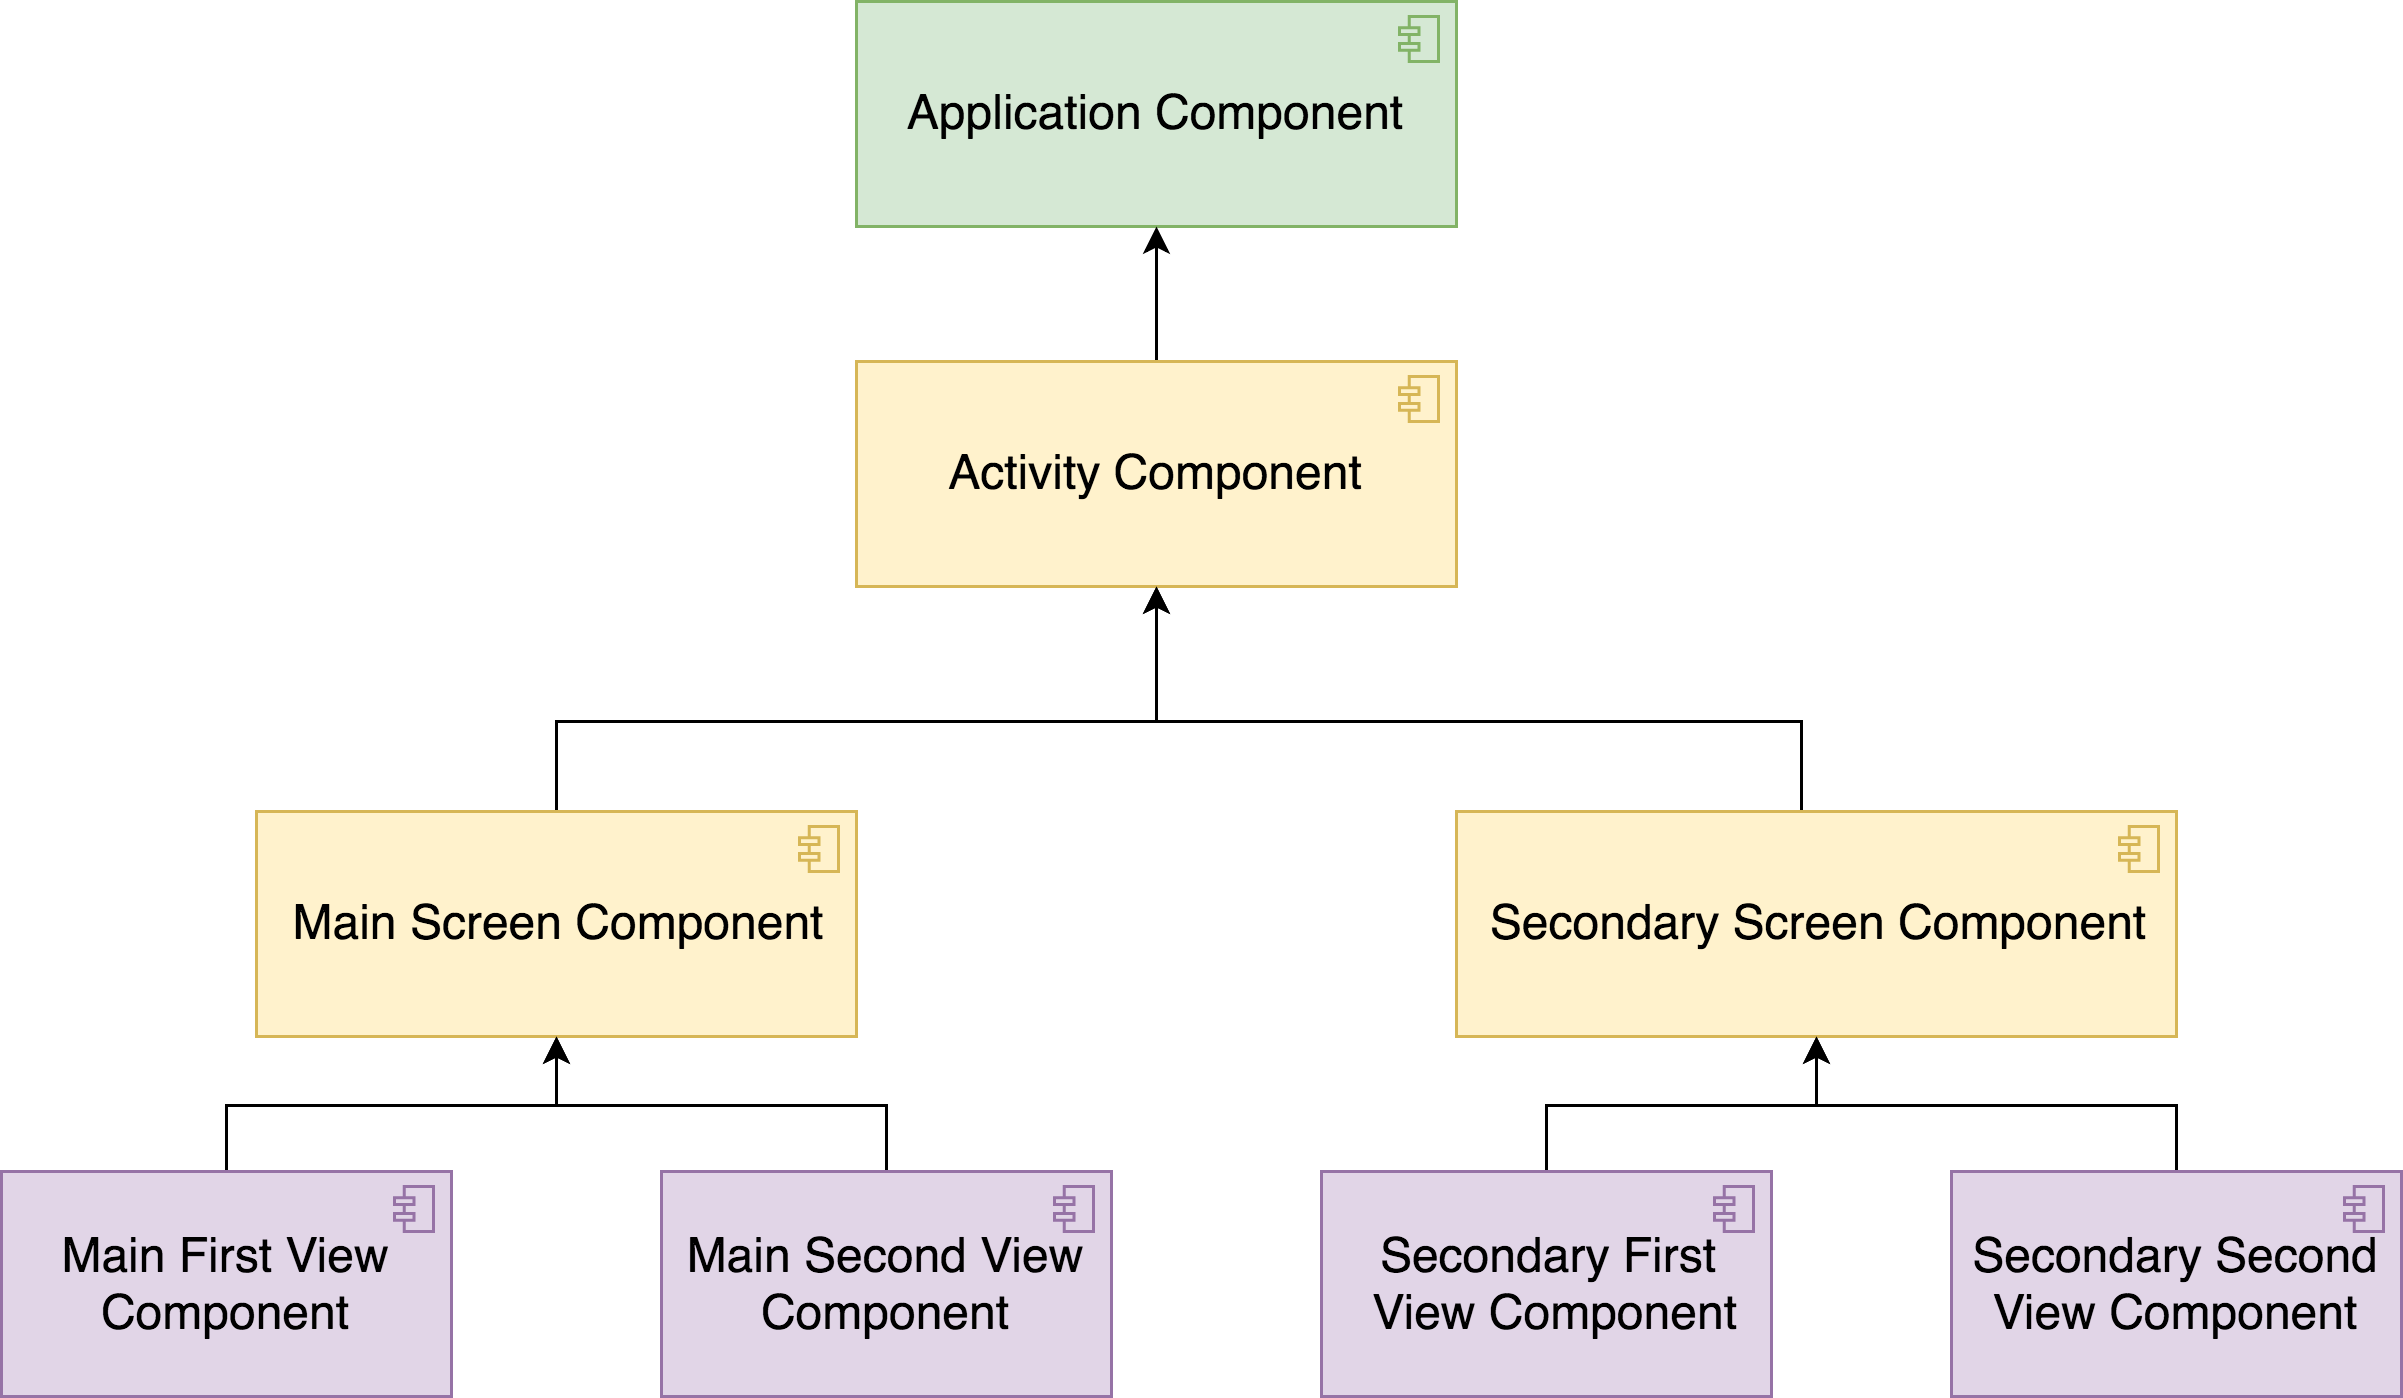
Please note the color of each component, it is assigned according to the scope of the component. As we have multiple components and they form the hierarchy, we need to define relationships between components. I have used the @Subcomponent relationship between child and parent components. Subcomponents have an access to the entire objects graph from parent components, including transitive dependencies. We will see later what happens under the hood with parent and child components.
Names are chosen just to make it clear which Android class a component is related to. I would have never used such names in real application.
Custom scope annotations
First of all, we need to define custom scopes, from the code perspective, a scope is nothing more than annotation. We will have multiple Scope annotations:
- @PerApplication – the global scope used for the Application component.
- @PerActivity – this scope is used mainly for base activities. Dependencies that are provided in that scope are usually from Android SDK, like Resources, Layout Inflater, Context. No activity specific dependencies are provided.
- @PerScreen – this scope has the same lifetime as the previous one. All scoped components are available during activity lifecycle. However, components in that scopes provide dependencies that are specific for the Activity/Module.
- @PerFragment – the narrowest scope that exists only during the Fragment lifetime. Components within the scope inject dependencies required by a single view. (The Fragment is just a view).
A custom scope is defined as follows:
@Scope @Retention(RUNTIME) public @interface PerApplication {}In order to create a Subcomponent, we need to access a parent component, hence let’s define an interface for that purpose.
public interface ProvidesComponentIt can be used as follows. Casting is not the best idea, however it is almost impossible to live without this feature in the Android world.
private void initDependencyComponents() { ApplicationComponent applicationComponent = ((ProvidesComponentUnscoped Dependencies
First of all we need to understand how do Unscoped dependencies behave and implemented in generated code.
Let’s create the Application Component and related modules.
@PerApplication @Component(modules = { ApplicationModule.class}) public interface ApplicationComponent { // Injection methods void inject(Dagger2ScopeInternalsApplication mainApplication); }Also create the Application module with some dependencies.
@Module public class ApplicationUnscopedModule { Application mApplication; public ApplicationUnscopedModule(Application application) { mApplication = application; } @Provides Application provideApplication() { return mApplication; } @Provides @Named(GLOBAL_APP_CONTEXT) public Context provideApplicationContext() { return mApplication.getApplicationContext(); } @Provides public CarDataRepositoryContract provideCarDataRepository() { return new CarDataRepository(); } }I have defined a simple interface CarDataRepositoryContract, without any method and implemented it. Next we need to set dependencies in Dagger2ScopeInternalsApplication, BaseActivity and MainActivity classes. Our main application class should look something like that for now.
public class Dagger2ScopeInternalsApplication extends Application implements ProvidesComponentAs you can see from the code above, we are building the Application Component, we need to store it as the class field to be able to access it from activities.
In activities to get the Application Component we are casting the Application class to the ProvidesComponent
Finally, in the MainActivity class we also injecting dependencies (only one dependency) using the component from BaseActivity as follows.
public class MainActivity extends BaseSingleFragmentActivity implements MainFirstFragment.SecondFragmentRouter { @Inject CarDataRepositoryContract mCarRepoOther; //… Other variables @Override protected void onCreate(Bundle savedInstanceState) { super.onCreate(savedInstanceState); injectDependencies(); //… Further initialization } private void injectDependencies() { mAppComponent.inject(this); } }You may wonder why do we need CarDataRepositoryContract in BaseActivity and MainActivity. In real world this doesn’t have any sense, but for our tutorial it will show how unscoped dependencies are provided. Let’s figure this out.
Build and launch the application, but set brakepoints on lines in all classes that have CarDataRepositoryContract as a dependency (e.g. the onCreate method).

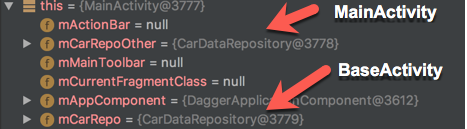
As you can see from results above, we got a new instance every time we requested dependencies. Even if you call the inject method multiple times in the same class you will get a new instance anyway.
Definitely, if we injected the Application dependency in activities it would be set to the same instance, as long as this object itself is a singleton.
You can get the code for that example from this commit.
To conclude:
- If you defined a provided method without the Scope annotation, anytime you request the dependency you will get a new instance.
- As you may have noted the Application Component was annotated with the @PerApplication annotation, but that didn’t change the situation.
- Calling injection from the same component (with unscoped providers) in the same class several times will result in new instances of dependencies.
Internals of generated classes
It’s time to look under the hood. Open the implementation of the ApplicationComponent interface.
Locating generated classes
You can find all generated files in the generatedJava directory or by navigating to implementations of the interface. Another way is just to find the class with the Dagger prefix for your component, for instance ApplicationComponent will have DaggerApplicationComponent implementation generated.
Here is the full code of the ApplicationComponent implementation, if you followed the described steps you should have a similar one.
public final class DaggerApplicationComponent implements ApplicationComponent { private ProviderComponents
Let’s start our journey from Components. Components are major building blocks of the Dagger 2 library. A Component implementation acts as a container (i.e. orchestrator) for all other players of Dagger 2. When you build a component you have to provide all dependencies that cannot be resolved automatically. Anyway, we are somehow addicted to Android SDK, hence Context, Application, Service classes are usually provided to modules to construct corresponding components.
Let’s discuss some snippets of the generated implementation. As you could see the creation of the component itself happens inside the Builder nested class. As a result you won’t be able to create the Component directly or to create it without provided required modules.
Components are not injecting dependencies by themselves, they just delegate this task to the MembersInjector classes.
@Override public void inject(Dagger2ScopeInternalsApplication mainApplication) { dagger2ScopeInternalsApplicationMembersInjector.injectMembers(mainApplication); }The creation of MembersInjectors happens after all Providers are created in the initialize() method.
MembersInjectors
MembersInjector classes are exactly responsible for injecting dependencies into dependent objects. Roughly speaking any class that requires dependencies and has at least one @Inject annotation has it’s corresponding injector.
Let’s have a look at the MainActivity_MembersInjector class.
public final class MainActivity_MembersInjector implements MembersInjectorIn order to a MembersInjector be created all dependencies should be provided via Provider classes passed to the create method.
Please pay attention to the highlighted lines (20,21,21). I have intentionally not mentioned this while describing the application structure. When a parent class has dependencies they should be satisfied before injecting dependencies in the child class. And that totally makes sense, otherwise you could get NullPointer Exceptions thrown. Dagger 2 is smart enough to detect such kind of relationships while building a dependency graph and generating classes. You can even remove the void inject(BaseActivity baseActivity) method, but the BaseActivity_MembersInjector class will still be generated.
When actual injection happens a MembersInjector instance delegates this request to a corresponding Provider.
Providers
Now, we have reached the most interesting part from that article’s perspective – Provider. Provider is a guy that uses created modules to provide dependencies. Let’s have a look at the implementation of the ApplicationUnscopedModule_ProvideCarDataRepositoryFactory.
public final class ApplicationUnscopedModule_ProvideCarDataRepositoryFactory implements FactoryAt line 14 you can see a direct call to the ApplicationUnscopedModule module. That’s it, we finally reached the source of the dependency.
I hope you have better understanding of how injection happens and flows. It’s time to understand how scopes affect all this stuff.
Scoped Dependencies
We need to create other components as they were defined at the diagram in the beginning of the article. For the simplicity I will have a single module per a component.
Due to the fact that child components and parent components are connected via the @Subcomponent mechanism, to create a child component we need to have access to the parent component. A parent component is responsible for creating a sibling component, but all required dependencies to modules are provided by the child component.
Subcomponents
Let’s define subcomponents according to the diagram and modify existing ApplicationComponent. I think it will be better to start from the bottom and move upwards.
MainFirstViewComponent
@PerFragment @Subcomponent(modules = {MainFirstFragmentModule.class}) public interface MainFirstViewComponent { void inject(MainFirstFragment fragment); }This component corresponds to the MainFirstFragment class and we need only one dependency to be injected in it, that is a router that will handle navigation between views.
public class MainFirstFragment extends BaseFragment { // Callbacks @Inject SecondFragmentRouter mRouter; // … other stuff public interface SecondFragmentRouter { void onSwitchToSecondFragment(); } }The containing activity will acts as a router, therefore we provide this dependency in the following way.
@Module public class MainFirstFragmentModule { @Provides @PerFragment public MainFirstFragment.SecondFragmentRouter provideSecondFragmentRouter(Activity containerActivity) { return (MainActivity) containerActivity; } }MainScreenModule
@PerScreen @Subcomponent(modules = {MainScreenModule.class}) public interface MainScreenComponent { void inject(MainActivity activity); MainFirstViewComponent plusMainFirstViewComponent(); MainSecondViewComponent plusMainSecondViewComponent(); }As far as we are using @Subcomponents we need to provide creator methods in the parent component to create children (plus methods). The Activity acts as a router and injected into both of child fragment components, albeit providing each component only required methods (Interface Segregation).
public class MainActivity extends BaseSingleFragmentActivity implements ProvidesComponentActivityComponent
@PerActivity @Subcomponent(modules = {ActivityModule.class}) public interface ActivityComponent { public void inject(BaseActivity baseActivity); // Subcomponents MainScreenComponent plusMainScreenComponent(); SecondaryScreenComponent plusSecondaryScreenComponent(); }The ActivityComponent component provides a more generic dependency graph with commonly used dependencies (FragmentManagers, LayoutInflaters) or Context specific dependencies. As you may already know, you can get different type of the Context class in runtime and using not applicable one may cause various problems, in the event of this you must not inject the Global Context(Application) everywhere. This only one case why we may need such kind of component.
In a like manner we are declaring creator methods for sibling components.
Components creation
Owing to using Subcomponents in order to create a child component we need firstly to get a parent one. Here is a chain component creation for better understanding.
Dagger2ScopeInternalsApplication
mApplicationComponent = DaggerApplicationComponent.builder() .applicationUnscopedModule(new ApplicationUnscopedModule(this)) .build();BaseActivity
ApplicationComponent appComponent = ((ProvidesComponentMainActivity
mMainScreenComponent = mActivityComponent.plusMainScreenComponent(); mMainScreenComponent.inject(this);MainFirstFragment
this.getComponent(MainScreenComponent.class) .plusMainFirstViewComponent() .inject(this);Nested Component Classes
Now compile the project and open DaggerApplicationComponent again. You can checkout this commit to get code that was written so far. Please attentively look through this file.
public final class DaggerApplicationComponent implements ApplicationComponent { private ProviderThat is how @Subcomponents work. Forasmuch as subcomponents need to have access to the dependency graph of the parent component there is already a features available out of the box in Java world – Nested Classes. As a result a subcomponent can just reference a Provider implementation from the parent component. Please note that whenever we call a plus method a new instance of subcomponent is returned.
What about scopes?
You may wonder, why I am telling you about components and subcomponents and nothing about scopes. Because there is no such term in generated code like Scope. Try to find in generated code any occurrences of “scope”, “PerActivity”, “PerApplication”. No matches? Please try to find differences between Providers that were created in the previous example of Unscoped dependencies and this one.
private void initialize() { this.provideLayoutInflaterProvider = DoubleCheck.provider(ActivityModule_ProvideLayoutInflaterFactory.create(activityModule)); this.provideSupportFragmentManagerProvider = DoubleCheck.provider( ActivityModule_ProvideSupportFragmentManagerFactory.create(activityModule)); // … }There is one small, but important, difference, that could be missed easily from the first sight – DoubleCheck.provider.
DoubleCheck == Scope ?
Finally, we have found how do all these scope annotations are represented in generated code. Let’s open the DoubleCheck class to what is going on there.
public final class DoubleCheckIf you have any previous experience working with Java, you might be familiar with the technique used in the get() method. It is called – Thread-Safe Singleton. In fact, that is how Scopes are maintained by Dagger 2.
The DoubleCheck class itself is the implementation of the ProxyPattern. It wraps a simple Provider implementation with caching and threading logic, so after first call of the get method you will be provided with the cached instance. There is also Lazy Initialization logic, however this is out of scope of the tutorial.
To summarize:
- Scopes are maintained with the help of Components and wrapped Provider implementations.
- Defining custom scopes doesn’t result in changes in generated code comparing to the @Singleton annotation. All scopes are almost the same from the code perspective.
- A scoped Component only can only have dependencies of the same scope or unscoped at all.
- DoubleCheck class is not the Scope, it is just a tool for caching and providing dependencies in a thread-safe manner.
- The only one scope keeper is a developer that uses Dagger 2.
Playing with Scopes
To consolidate information, let’s break Dagger 2 scopes by improper use of library.
If you are attentive you may have noted that I used ApplicationUnscopedModule, in consequence we have the lack of the DoubleCheck wrapper around this provider. Now let’s see what are possible cases of violating Dagger 2 rules.
Recreating components
Consider the following case, when you called called dependency injection several times and haven’t checked whether component was already created.
@Override protected void onCreate(Bundle savedInstanceState) { super.onCreate(savedInstanceState); // Inject views injectDependencies(); ButterKnife.bind(this); initUI(); navigateToInitialScreen(); injectDependencies(); } private void injectDependencies() { mMainScreenComponent = mActivityComponent.plusMainScreenComponent(); mMainScreenComponent.inject(this); }In that case all dependencies that are in the Scope of Main Screen Component will be recreated. For instance if we add a dependency into the MainScreenModule as follows.
@Provides @PerScreen public MainScreenDependencyContract provideMainScreenDependency() { return new MainScreenDependency(); }And call the injectDependencies method twice, two instances of MainScreenDependency will be created and only the last one will be left.
Less obvious situation may happen when you place component creation into a not proper lifecycle method, without checking existence of the component.
@Override protected void onResume() { super.onResume(); injectDependencies(); }Activity can be hidden or showed any number of times during it’s lifecycle, for instance when the Activity is overlapped by another Activity, it could be Camera, File Chooser, etc.
Memory leaking
Another possible problem that you may encounter is not related to DI or Dagger 2 itself, but it is important to keep this in mind, especially when working with Android SDK with a large number of callbacks and listeners. Consider the following interface.
public interface GlobalEventNotifierContractFor instance, we may be interested in some global application events, like push messages, etc. Implement this interface in Dagger2ScopeInternalsApplication
public class Dagger2ScopeInternalsApplication extends Application implements ProvidesComponentAnd in activities we are adding ourself as a listener for events.
public class MainActivity extends BaseSingleFragmentActivity implements ProvidesComponentAdditionally, add the same code to the SecondaryActivity class. Run the application and try to navigate back and forth between activities. What do you think happens right now? Open Profiler and explore memory.

Memory is allocated but not released. Let’s examine what listeners do we have registered.
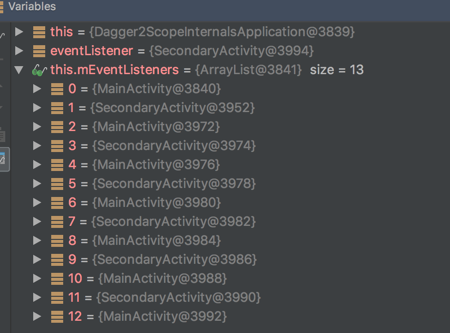
Something is probably wrong here :). All in all, be very careful passing callbacks and listeners, don’t forget to unsubscribe.
@Singleton != Singleton
Do not think that the @Singleton annotation magically makes your dependency a real Singleton object. This annotation due to it’s name may cause confusion. Dagger just uses this annotation for several checks. This annotation is defined in the javax.inject package (JSR 330), not in the Dagger library, that you may already met this annotation in Java.
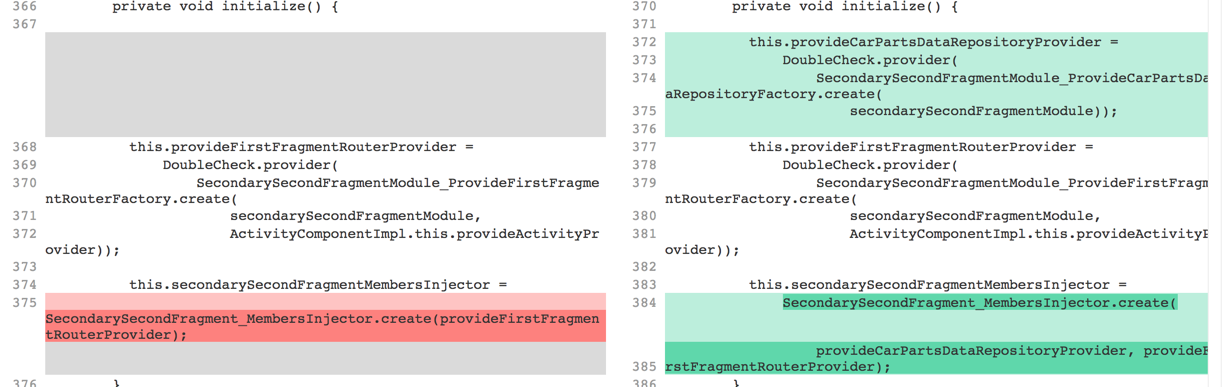
Try to change the scope of SecondarySecondViewComponent and all related modules to @Singleton like that.
@Provides @Singleton public SecondarySecondFragment.FirstFragmentRouter provideFirstFragmentRouter(Activity containerActivity) { return (SecondaryActivity) containerActivity; } @Provides @Singleton CarPartsDataRepositoryContract provideCarPartsDataRepository() { return new CarPartsDataRepository(); }Compile the application and open the DaggerApplicationComponent, try to find differences. Eventually, you won’t find any real Singleton stuff except DoubleCheck, Dagger 2 treats @Singleton annotation in the same way as any other scope annotation.
In conclusion, let’s look at a comment from Dagger 2 source code.
*In order to get the proper behavior associated with a scope annotation, it is the caller’s * responsibility to instantiate new component instances when appropriate. A {@link Singleton} * component, for instance, should only be instantiated once per application, while a * {@code RequestScoped} component should be instantiated once per request. Because components are * self-contained implementations, exiting a scope is as simple as dropping all references to the * component instance.
Generally speaking, I do not suggest you to use the @Singleton annotation if you have just started working with Dagger 2, it will be much better if you try to create your own scope and learn more about scopes instead of blindly using @Singleton everywhere.
Conclusion
I hope that after reading this article you have got better understanding of Scopes and what stays behind the scenes of Dagger 2 dependency injection.
Dagger 2 is a great tool that will make you application much more flexible and maintainable if applied correctly. Don’t hesitate to look into internals of implementation that will help to use a tool in a right way.
If you have any questions or suggestions please leave them below in comments.
Hi, my name is Molochko Alexander, I am Interested in different areas of software development, curious about learning and discussing architectural and software patterns, examining internals and understanding how everything works under the hood.
Recent posts
- Mar 1, 2020 Implementing Laravel custom Auth Guard and Provider
- Feb 16, 2019 Hacking Java Applications with Byte Buddy and Decompilers
- Jan 5, 2019 Page Specific Dynamic Angular Components using Child Routes
- Oct 13, 2018 Understanding Dagger 2 Scopes Under The Hood
- Jul 21, 2018 Understanding and using Xdebug with PHPStorm and Magento remotely
Popular posts
- 143492 Views How to Install The Latest Apache Server (httpd) on Centos 7
- 106817 Views Routing network traffic through a transparent SOCKS5 proxy using DD-WRT
- 76560 Views How to Unbrick TP-Link WiFi Router WR841ND using TFTP and Wireshark
- 75286 Views Android Reverse Engineering: Debugging Smali in Smalidea
- 62746 Views Clean Architecture : Part 2 – The Clean Architecture