DD-WRT is a great firmware that is developed to enhance the performance and bring powerful features to cheap routers (even < 50$), making them super routers. However one feature is missing by default is transparent proxifying of network traffic through a SOCKS5 proxy server, whereas you can establish a virtual encrypted tunnel VPN to a network directly from a DD-WRT powered router. Personally I have a very cheap router TP-Link TL-WR841ND v8, I have never thought that this device could have all these features that are available now thanks to the DD-WRT firmware. I use SOCKS5 proxies regularly and I need to configure browsers, change system settings every time configuration changes. Even more, I haven’t managed to configure system-wide proxy on macOS, some applications don’t respect proxy settings and send network traffic directly. As a result I decided to configure a transparent proxy/redirector to ensure that all traffic is really forwarded to a proxy server and there is no better place other than a router to control all network communications.
This tutorial will guide you through the process of configuring the network-wide proxy redirector using Redsocks and a router with DD-WRT installed.
Prerequisites
In order to complete this tutorial you need basic networking and administration knowledge. Nevertheless I will try to explain each step as detailed as possible. Furthermore you will need the following software/hardware:
- A DD-WRT powered router (with a DD-WRT firmware installed)
- A real machine or virtual machine on your network to act as a transparent proxy redirector
What is DD-WRT ?

As I have already mentioned DD-WRT is a firmware that boost up your router revealing a lot of useful features that are not available with the default firmware installed. Under the hood DD-WRT is a Linux-based firmware, yeah it is a tiny Linux OS running in your router. Surely, this is not plain Linux like you may have running on your desktop, it is modified to satisfy router requirements.
One of the most important features is that DD-WRT comes with a nice, intuitive WEB UI. I enjoy working in the terminal, but you should have a really good memory to remember (because when you are configuring a router you may not have the Internet access) all configuration options and commands that are used to configure a router. However, if despite that you still want to use command line to configure your router, try OpenWRT.
I won’t cover the process of installing the DD-WRT firmware on a router, as far as there is a variety of different routers that support DD-WRT and it is impossible to cover this even in several articles. Hence, if your router supports DD-WRT find a tutorial describing the process of installing DD-WRT on your router. In most cases the steps don’t differ from the official firmware update process.
What is a transparent proxy/redirector ?

A transparent proxy – is a server that receives your request and then fetches requested resource, gets the responses and returns the result to you, so this server sits between you and the outer world. The main feature of a transparent proxy is that it doesn’t modify your requests and just sends them to other servers. Mostly these proxies are used to cache requests and usually a client is not aware of using proxy, thus this type of proxy server is called transparent. Here are some common uses of a transparent proxy:
- Caching Proxy – caching responses in order to accelerate web browsing and reduce the response time.
- Filtering traffic – Forbid or allow certain domains to be accessed by a client.
- Gateways – Acting as a gateway from a local network or a corporate network.
A transparent redirector – is an application that just directly forwards all your packets to a proxy server. It differs from a transparent proxy in not fetching a requested resource, but instead it simply redirects a complete request to a proxy server. Consequently, in it’s turn a proxy server fetches the requested resource for you and therefore your real IP is concealed on a proxy server’s side, not by a transparent redirector like Redsocks.
Transparent redirectors frequently used as a system-wide proxy, all packets in the system are forwarded to a process running locally (or it can be running on the other machine) and a redirector process sends all received packets to a proxy server according the configuration file. This is like a postman or a delivery company carries packets from sender to receiver without modifying the content of a packet (at best).
The Network topology
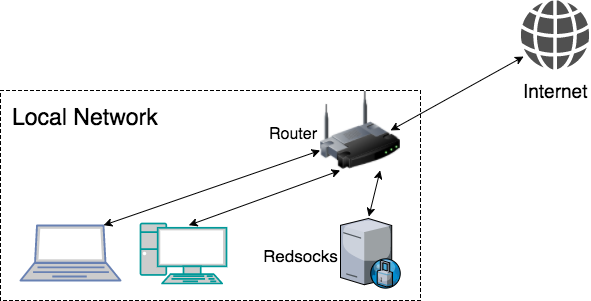
In the figure above you can see the network topology we are going to build. The topology is quite simple, however it is crucial to understand how does a network packet flows through the network.
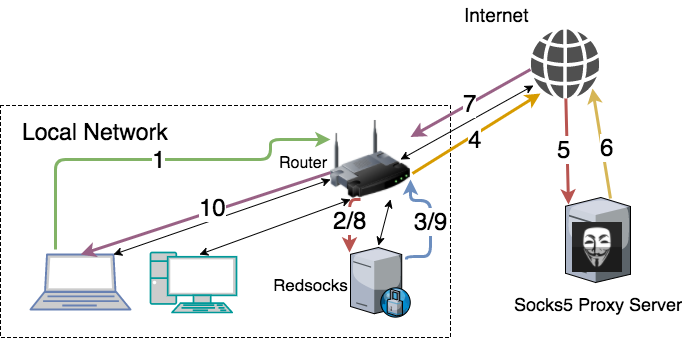
Let’s follow the packet flow through the network step by step.
- A client in the network sends a request, for example to access https://google.com.ua. The network packet is send from the client’s OS to our router, since the default gateway is set to the IP address of the router.
- The router receives the packet and than checks where to route the packet according rules defined in it’s memory (NVRAM). We are going to configure iptables rules later in this article. For just this case consider that the client matches defined rules and therefore the packet is redirected to the proxifying machine.
- So the packet is now being redirected to the proxifying machine. When the proxifier(Redsocks) receives the packet it just forwards/redirects it to the defined proxy servers. On this stage the packet may be wrapped according to a proxy protocol, for instance the authentication headers may be added. And after that the packet is sent back to the router.
- The router forwards this packet out of the local network to the Internet.
- On this phase the packet travels through different routers, ASes, through your ISP and further in order to reach the destination proxy server (in our case it is a SOCKS5 proxy server).
- When the packet reaches the destination proxy server. It is handled by the proxy server. The proxy server fetches the requested resource, in this case the main google search page and afterwards returns the result back to you.
- Now the packet completes the reverse path through Internet, ISP to the router.
- The router receives the incoming response and redirects it to the origin, the proxifying machine.
- The proxifier in it’s turn sends the response back to the requesting party, the client in our network, but firstly the packet gets to the router, as far as only router knows all paths in the network and keeps NAT and routing tables.
- Finally, the client gets the response, in this case the google page will be rendered in a browser.
The packet path is relatively long, to reduce the response time, we could implement redirection to a SOCKS5 proxy server directly on the router, but unfortunately my router is not powerful enough, to handle this by itself, it won’t even establish an OpenVPN connection. If you have a more powerful router, you could try to compile appropriate software and configure it to redirect packets directly to a proxy server.
Step 1 — Flashing DD-WRT firmware on the router
You can find out whether your router supports the DD-WRT firmware on the Supported Device page.
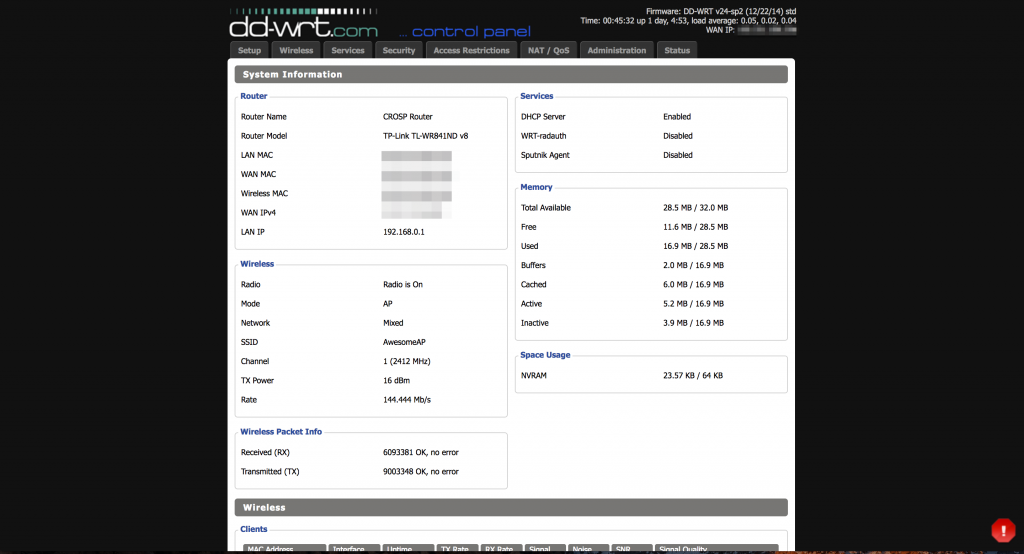
Find and follow the instructions for flashing the firmware on your router. After flashing the firmware you should be able to access the DD-WRT Web UI. In my case it looks as follows
Enabling SSH Management
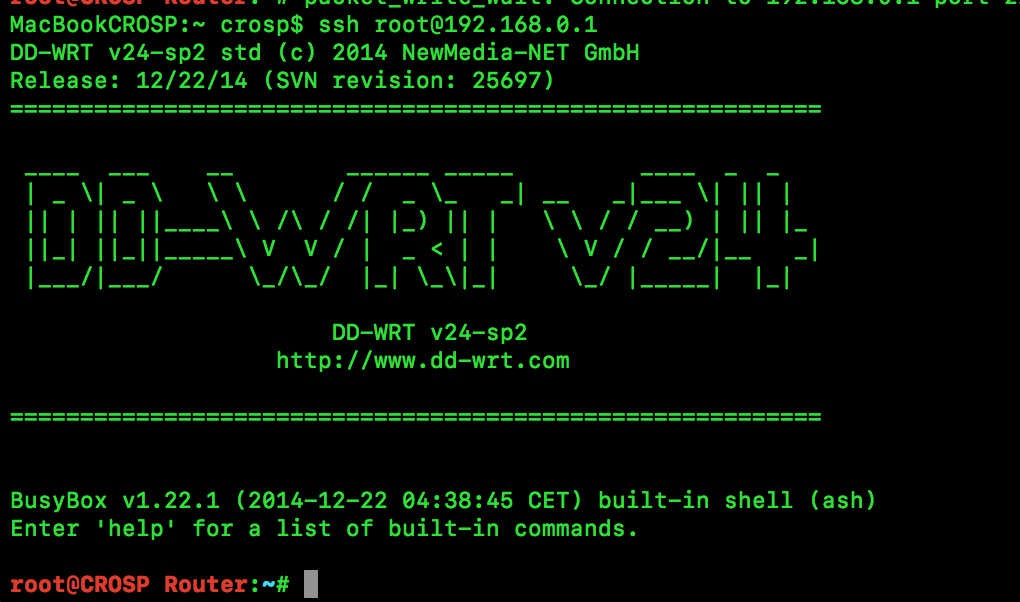
As far as we will execute bash commands, we need a way to enter these commands. You can use the WEB UI to execute commands, but I prefer doing this from the terminal. In order to configure the Remote SSH Management for your router, first of all access the Web Management UI, in the event of my local network it is accessible at 192.168.0.1.
First of all, navigate to the Service tab. Then, scroll down to the Secure Shell section.
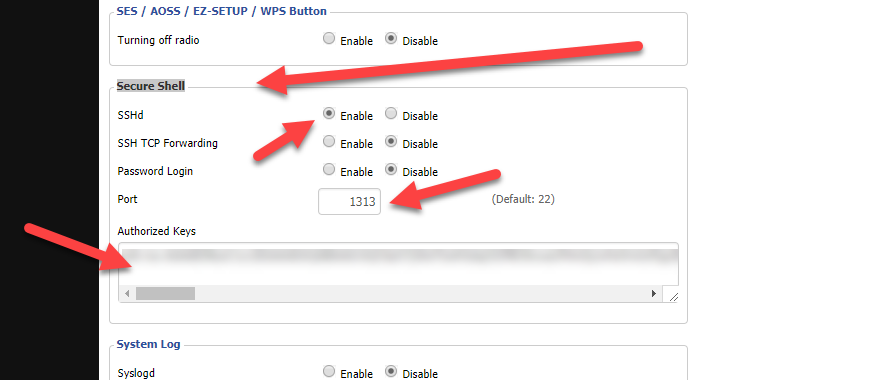
In this section enable SSHd. Next, set the port number for accessing the router via SSH, by default it is 22, so if you have port 22 already forwarded, you have to choose another port. After, you can allow using password, however, it would be better to use SSH keys for security reasons. So if you will be using SSH keys, disable Password Login and paste your public key in the Authorized Keys text area. It should be formatted in the following way.
1 | ssh-rsa <key>
|
Default credentials
If you decided to use the Password Authentication, then the username is root and the password is admin by default.
Save new settings by clicking on the Apply Settings button. Next go to the Administration tab and find the Remote Access section.
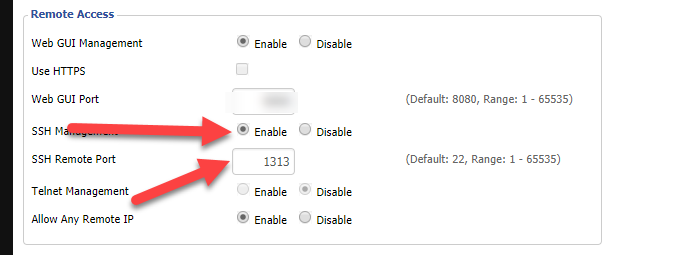
Enter the same port number as you have entered in the previous tab and enable the SSH Management option. Then, save settings.
Now you should be able to connect to your router using a similar command, don’t forget to setup you SSH keys correctly.
1 | ssh -p <portnumber> [email protected]
|
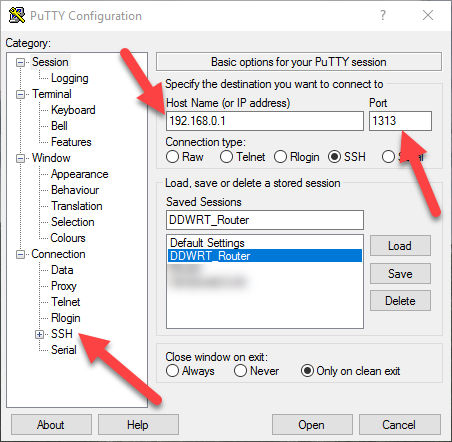
In case you are a Windows user, you need to use Putty for connecting to your router via SSH. Open Putty and enter the router’s IP address and the port number you have just set.
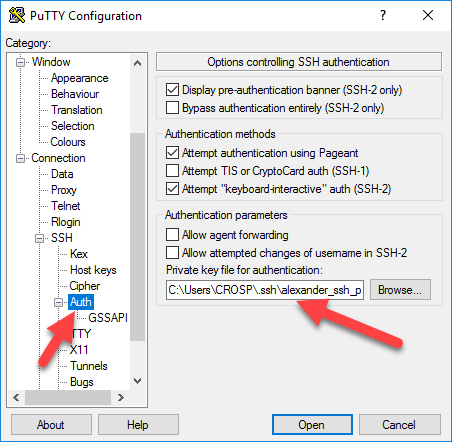
If you are using SSH keys for authentication, then go to the SSH settings category and then to the Auth category. Select your private key, it should be in the PPK Format. You can use Puttygen to convert SSH keys.
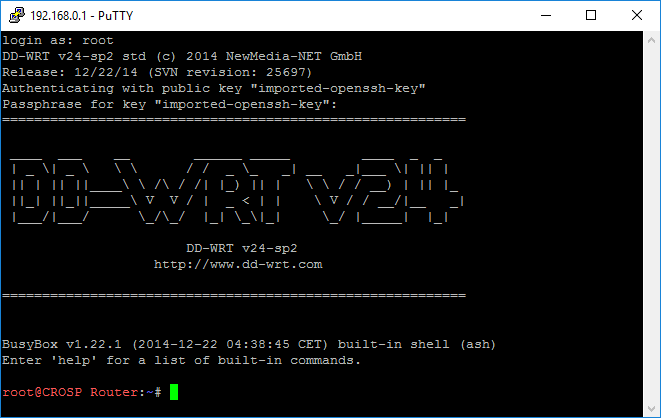
Don’t forget to save the session settings. Now try to open a connection to the router (use root for username), you might be asked to enter a passphrase if your private key is protected.
Step 2 — Setting up a proxifying machine
Now, we need to configure a machine that will have Redsocks running and as a result act as a “proxifier”. You are free to use a real machine, but usually it’s irrationally to use a separate machine just for this purpose. Therefore, I will use a virtual machine. Another great choice would be an embedded computer like Raspberry PI, Onion Omega, Orange Pi, etc. But I would suggest not to use WiFi connection in case of embedded device, but use the Ethernet interface instead.
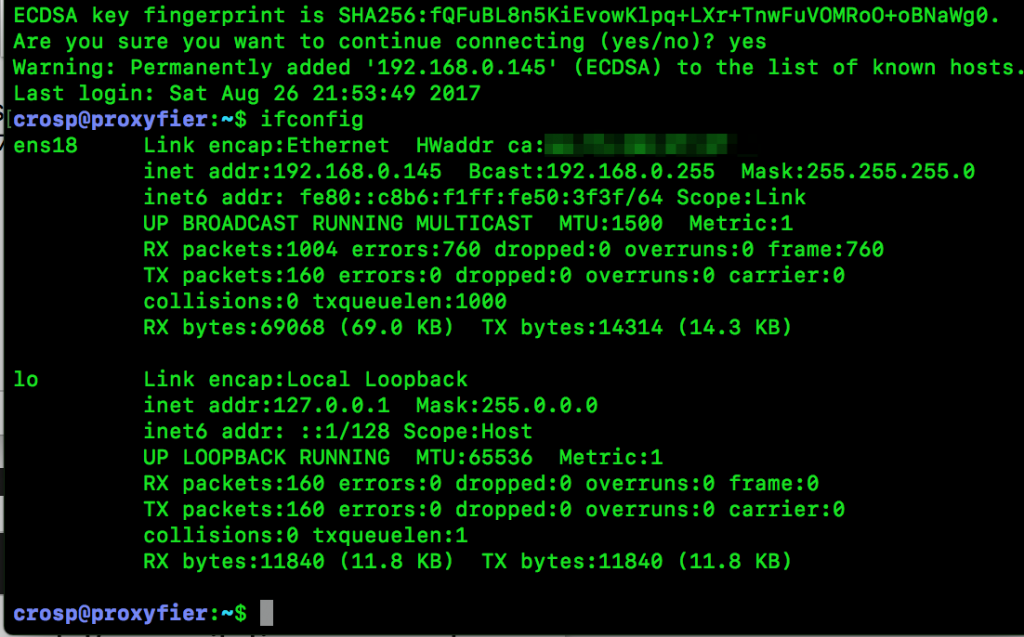
I have a PC at home with Proxmox installed, so I will create a virtual machine for this purpose and install Ubuntu 16.04 distro there.
Next, before continue we need to ensure that our machine will always have the same IP address assigned. The guy that is responsible for that is called DHCP server and it is running on your router. We need to configure a static DHCP lease to assign a static IP address to a specific machine.
First of fall you need to find out the mac address of your machine. In my case I can find it through the Proxmox WEB UI in the configuration of the virtual machine. After you have the mac address of your machine. Open the DD-WRT UI and navigate to the Services (the Services tab) and find the “Static Leases” table on the page. Click Add and fill in all required fields. In my case I have the following data entered.

Click Apply Settings, you may need to clear the lease cache and request a new IP address from the DHCP server. Ensure that to the correct IP address was assigned to your machine.
Step 3 — Compiling and installing Redsocks
Next we need to install Redsocks, a transparent redirector. I have written a complete article about installing and configuring Redsocks. Please follow the instructions, but do not set any iptables rules for now or you may set some rules just to check that Redsocks is working properly.
Please note, that you should set the local_ip property to 0.0.0.0 to be able to connect externally. Here is my configuration file (/etc/redsocks.conf).
1 2 3 4 5 6 7 8 9 10 11 12 13 14 15 16 | base {
log_info = on;
daemon = on;
log_debug = on;
log = "file:/var/log/redsocks.log";
redirector = iptables;
}
redsocks {
local_port = 12345;
ip = 33.33.33.33;
local_ip = 0.0.0.0;
disclose_src = false;
type = socks5;
port = 33333;
}
|
One more important point here is that packets will be sent to different ports on the proxifying machine depending on a protocol used, however the Redsocks process listens to one specific port number. Therefore, we need to redirect all incoming packets to the port the Redoscks process listens to. You can achieve this with the following rule.
1 | iptables -A PREROUTING -t nat -i ens18 -p tcp -m multiport --dports 80,443 -j REDIRECT --to-port 12345
|
Step 4 — Adding Iptables rules on the router
Now we have reached the most important part of the tutorial, we are going to set iptables routing rules in our DD-WRT powered router.
If credentials are valid, you should see greeting from your router.
You may have different cases and goals, so apply your iptables rules instead. In this article I am going to redirect all HTTP/HTTPS packets from a specific host to the transparent redirector.
First of all we need to know what packets should be redirected through the proxy in our network. We have two available choices to use NAT or the Mangle Table (MARK). Using the NAT method, due to change of destination and source addresses, an IP packet will be modified. This leads to undesirable consequences, some of them are described here. Accordingly, we will stick to the Mangle table option, since in this case packets remain unmodified.
Under the hood
The MANGLE table is used to modify packets, mostly it used to set the Type of Service (TOS) or Time to Live (TTL) fields in the IP header. Another case when it comes in handy is to MARK packets to somehow group related packets, making it easier to process these packets further. For instance make routing decisions, as you will see later in this article. One important thing in understanding the MARK target is that a packet itself is not modified at all, all information about marks is stored in the Kernel memory. If you are lucky (you have specific kernel modules loaded) you may find information about individual packets and connections in the pseudo /proc/ filesystem in /proc/net/ip_conntrack and /proc/net/nf_conntrack respectively.
Let’s set rules to mark only appropriate packets (in my case HTTP/HTTPS packets).
1 | iptables -I PREROUTING 1 -t mangle -s 192.168.0.113 ! -d `nvram get lan_ipaddr`/`nvram get lan_netmask` -p tcp -m multiport --dports 80,443 -j MARK --set-mark 3
|
I think this rule requires a brief explanation.
- -I PREROUTING 1, Insert (not append -A) the rule into a specific position of the PREROUTING chain. I am inserting the rule and not appending (-A) it on account of the priority of rules. At first by appending new rules at the end of the ruleset I got undesired behavior, my rule was overridden by the rule above.
- -t mangle, Inserting the rule into the mangle table. Please note that this table is present not only in the PREROUTING chain.
- -s 192.168.0.113, This rule matches only if the source IP address is equal to the defined value (192.168.0.113 in this case).
- ! -d `nvram get lan_ipaddr`/`nvram get lan_netmask`, This is the most interesting part. We need to exclude local addresses from being proxified. Note the exclamation sign. The commands nvram get lan_ipaddr and nvram get lan_netmask are just simple bash commands that are available on DD-WRT flashed routers because of special tool /usr/sbin/nvram. This tool is primary used for change/retrieve the content (configuration) stored in the persistent storage.
- -p tcp -m multiport –dports 80,443, As far as both of HTTP and HTTPS protocols are based on the TCP protocol we are setting protocol to tcp and ports used accordingly.
- -j MARK –set-mark 3, Finally, we are jumping to (-J) the MARK target and setting a packet’s mark to 3.
The next rule is similar to the previous one, but we are jumping to the different target CONNMARK. This target is used to mark a whole connection, whereas the MARK target marks individual packets.
1 | iptables -I PREROUTING 2 -t mangle -s 192.168.0.113 ! -d `nvram get lan_ipaddr`/`nvram get lan_netmask` -p tcp -m multiport --dports 80,443 -j CONNMARK --save-mark
|
The –save-mark target is used to apply a packet mark onto a connection, resulting in the whole connection being marked according the packet.
In addition we need to exclude our public IP from routing through the proxy server. I have faced with the interesting problem. After applying rules above I wouldn’t be able to access local network resources that are available publicly and resolve to my public IP, like someresource.crosp.net. To get the public IP address on a DD-WRT router we can use the following command.
1 | nvram get wan_ipaddr
|
As a consequence, we will have the following rules for iptables.
1 2 3 4 | iptables -I PREROUTING 1 -t mangle -s 192.168.0.113 ! -d `nvram get lan_ipaddr`/`nvram get lan_netmask` -p tcp -m multiport --dports 80,443 -j MARK --set-mark 3
iptables -I PREROUTING 2 -t mangle -s 192.168.0.113 ! -d `nvram get lan_ipaddr`/`nvram get lan_netmask` -p tcp -m multiport --dports 80,443 -j CONNMARK --save-mark
iptables -I PREROUTING 3 -t mangle -s 192.168.0.113 ! -d `nvram get wan_ipaddr` -p tcp -m multiport --dports 80,443 -j MARK --set-mark 3
iptables -I PREROUTING 4 -t mangle -s 192.168.0.113 ! -d `nvram get wan_ipaddr` -p tcp -m multiport --dports 80,443 -j CONNMARK --save-mark
|
The next and last step is to add static routing rules.
1 2 | ip rule add fwmark 3 table 13
ip route add default via 192.168.0.145 table 13
|
We are redirecting all packets marked with the number 3 into the table numbered 13, and adding the default route through the proxifing machine to the table. 192.168.0.145 is the IP address of the proxifying machine.
All in all, here are all rules or the bash script we need to apply to get packets redirected to the proxifying machine.
1 2 3 4 5 6 7 | iptables -I PREROUTING 1 -t mangle -s 192.168.0.113 ! -d `nvram get lan_ipaddr`/`nvram get lan_netmask` -p tcp -m multiport --dports 80,443 -j MARK --set-mark 3
iptables -I PREROUTING 2 -t mangle -s 192.168.0.113 ! -d `nvram get lan_ipaddr`/`nvram get lan_netmask` -p tcp -m multiport --dports 80,443 -j CONNMARK --save-mark
iptables -I PREROUTING 3 -t mangle -s 192.168.0.113 ! -d `nvram get wan_ipaddr` -p tcp -m multiport --dports 80,443 -j MARK --set-mark 3
iptables -I PREROUTING 4 -t mangle -s 192.168.0.113 ! -d `nvram get wan_ipaddr` -p tcp -m multiport --dports 80,443 -j CONNMARK --save-mark
ip rule add fwmark 3 table 13
ip route add default via 192.168.0.145 table 13
|
Important note
All the rules you set will be lost after router reboot. Under these circumstances, if you need to persist rules there different choices you have. For instance you can do this from the WEB UI, navigating to Administration -> Commands and clicking Save Firewall after you have entered your rules.
When you need to disable proxification, you can use the following rules, or simply reboot a router :).
1 2 3 4 5 6 7 8 9 10 11 | #!/bin/sh
PROXIFYING_MACHINE=192.168.0.145
MACHINE_TO_PROXIFY=192.168.0.113
iptables -D PREROUTING -t mangle -s $MACHINE_TO_PROXIFY ! -d `nvram get lan_ipaddr`/`nvram get lan_netmask` -p tcp -m multiport --dports 80,443 -j MARK --set-mark 3
iptables -D PREROUTING -t mangle -s $MACHINE_TO_PROXIFY ! -d `nvram get lan_ipaddr`/`nvram get lan_netmask` -p tcp -m multiport --dports 80,443 -j CONNMARK --save-mark
iptables -D PREROUTING -t mangle -s $MACHINE_TO_PROXIFY ! -d `nvram get wan_ipaddr` -p tcp -m multiport --dports 80,443 -j MARK --set-mark 3
iptables -D PREROUTING -t mangle -s $MACHINE_TO_PROXIFY ! -d `nvram get wan_ipaddr` -p tcp -m multiport --dports 80,443 -j CONNMARK --save-mark
while ip rule delete from 0/0 to 0/0 table 13 2>/dev/null; do true; done
ip route flush table 13
|
Step 5 — Putting all pieces together, proxy testing
It is the time to test our configuration.
First of all, run Redsocks on the proxifying machine, ensure that the process listens to the 0.0.0.0, not the localhost (127.0.0.1).
1 2 3 4 5 6 7 | root@proxyfier:/home/crosp# /opt/redsocks/redsocks -c /etc/redsocks.conf
root@proxyfier:/home/crosp# netstat -tulpn
Active Internet connections (only servers)
Proto Recv-Q Send-Q Local Address Foreign Address State PID/Program name
tcp 0 0 0.0.0.0:22 0.0.0.0:* LISTEN 977/sshd
tcp 0 0 0.0.0.0:12345 0.0.0.0:* LISTEN 1174/redsocks
tcp6 0 0 :::22 :::* LISTEN 977/sshd
|
Next set your iptables and routing rules on your router.
Finally, check whether your traffic is proxified now, for example by executing this command on your machine that you have set in the rules.
1 2 | MacBookCROSP:~ crosp$ curl 'https://api.ipify.org?format=json'
{"ip":"22.22.22.22"}
|
In case of successful configuration you should see the IP address of a proxy server you have used while setting Redsocks.
Step 6 — Making rules/scripts permanent (Optional)
If you need to persist the proxy scripts and do not want to reconfigure all rules anytime the router reboots, then you have multiple choices to achieve this. Here is an article describing all possible ways to create startup scripts. However, in my case I have no option to enable JFFS on the router, since it has restricted hardware resources. There are some advanced options and workarounds to enable JFFS on routers with poor hardware, however this requires some time and effort to get it working.
Therefore, I need to use other methods, like NVRAM to save startup scripts. There is a great number of different routers, each has a different hardware capabilities, consequently I am not able to describe all methods. Try to find a suitable solution for your router or a similar one.
Conclusion
In this article I’ve described how to configure network traffic proxification using a DD-WRT router with Redsocks. There are some important benefits of this approach. First of all, you can transparently use proxy for a single machine, multiple machines or even a whole local network. Secondly, using the mangle table prevents some problems, furthermore packets are not modified and NAT is not used. You can try to create more complex topologies and in case you have more powerful router, you can try to move some software directly on your router doing that will speed up network connections dramatically.
I hope this tutorial was useful for you. If you have any troubles with setting up this configuration, please feel free to leave comments below.
Hi, my name is Molochko Alexander, I am Interested in different areas of software development, curious about learning and discussing architectural and software patterns, examining internals and understanding how everything works under the hood.
Recent posts
- Mar 1, 2020 Implementing Laravel custom Auth Guard and Provider
- Feb 16, 2019 Hacking Java Applications with Byte Buddy and Decompilers
- Jan 5, 2019 Page Specific Dynamic Angular Components using Child Routes
- Oct 13, 2018 Understanding Dagger 2 Scopes Under The Hood
- Jul 21, 2018 Understanding and using Xdebug with PHPStorm and Magento remotely
Popular posts
- 143497 Views How to Install The Latest Apache Server (httpd) on Centos 7
- 106907 Views Routing network traffic through a transparent SOCKS5 proxy using DD-WRT
- 76565 Views How to Unbrick TP-Link WiFi Router WR841ND using TFTP and Wireshark
- 75299 Views Android Reverse Engineering: Debugging Smali in Smalidea
- 62750 Views Clean Architecture : Part 2 – The Clean Architecture