Today almost every new project has an API, in most cases it is a RESTFul API. Building a REST API is essential part of any system that has mobile, SPA and other client apps. Sometimes it is used as a single entry point to your system. Creating a secure REST API using NodeJS is easier than using other languages and frameworks (personal experience). NodeJS has become a ubiquitous technology. There is a great community, the sheer number of frameworks and libraries and therefore a lot of documentation and blog posts about. Nevertheless, NodeJS cannot satisfy all types of requirements, especially when it comes to complex multithreading and parallel processing, but it is a good technology to start with.
Introduction
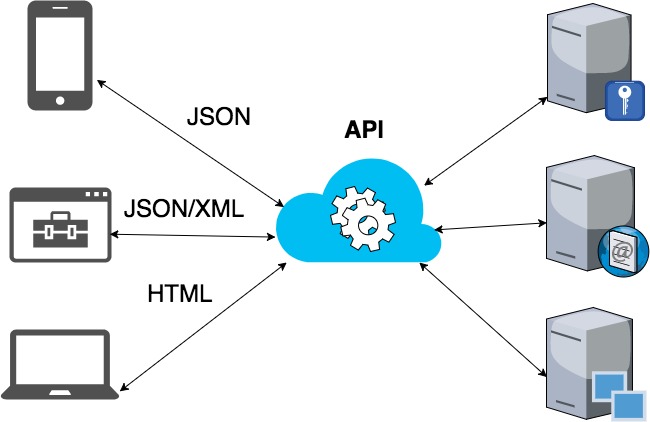
This post series is intended to describe how to combine several components in order to build a secure API that could be consumed by a client application. APIs are everywhere, so it won’t hurt to have an idea about what is going on under the hood even if you are a mobile or frontend developer. This guide assumes that you have a basic idea what is an API and why do we need it, understanding networking and how the HTTP protocol works and what security issues it has. But I will try to explain the most important parts as we go along.b
Getting started
We will create a simple secure REST API for managing blog posts. This project should just give an idea and a starting point. But before we start, I think there some pertinent topics should be covered at first. I won’t dive deep in details, but try to highlight the most significant principles. If you have good understanding of REST API and just need to see code, feel free to go to the next part.
RESTFul API design

The main purpose of this tutorial is to create a REST API, so it is necessary to have the good understanding what it is really about.
APIs are everywhere now, when you visit any popular website (social networks, music and video services), it’s a near certainty that if you try to google “<the name of the service> + API”, you will probably find relevant results.
The REST architectural style was firstly defined in 2000 by Roy Fielding. If we compare the principles described in his work with the style used now for creating APIs we will find a lot of differences, but the main idea stays the same. Here are the principles I find most important to consider while developing a REST API :
Use nouns instead of verbs
One idea behind REST API is to leverage transport layer methods. In most cases it is HTTP, because the RESTFul design was initially designed based on the HTTP protocol and it’s methods. However, the main idea is separate your system into resources, and as a result you can use CRUD operations for management. Compare the following endpoint GET /getAllPosts with GET /posts. The former endpoint already has a verb in it’s name, furthermore we are using the GET method to call the endpoint. Just read this : get get all posts. Things get even worse in the following example: POST /getAllPosts. For sure, it is not always possible to divide your system into distinct resources that can be managed by HTTP methods and login/authentication is a well-known example.
Prefer using HTTP error codes
There are 75 status codes and in most cases you can find a suitable one. Do not reinvent the wheel if you are not obliged to. Furthermore, I suggest you to provide an explanation message in the response to a client, but not a stack trace :). And the last advice here is from this great book.
If you return a HTTP status code of 200 with an error code then Chuck Norris will roundhouse your door in, destroy your computer, instantly 35-pass wipe your backups, cancel your Dropbox account and block you from GitHub. HTTP 4xx or 5xx codes alert the client that something bad happened, and error codes provide specifics of the exact issue if the client is interested..
Versioning
Versioning is very important if you are going to expose your API. It doesn’t matter whether it will be accessible privately or publicly. If there is more than one client going to use an API you should consider versioning. Any change made that is not backward compatible, obviously will brake client applications. It doesn’t mean that every time a new commit is made you should create a new version of your API. This is required when you are going to make global(visible from client perspective) changes that might lead to unpredictable behavior or are not compatible at all. Facebook, Twitter, Github they all use API versioning.
Document your API
API should be always documented, since this is the only one way you can describe it to clients or other developers.
Stateless
This concept is misunderstood very often. Are you going to use cookies or sessions with REST API ? Usually that is a bad idea. All credentials should be provided with the request. Sometimes boundaries are blurry as far as a server anyway should know something about the client, persist access tokens, passwords etc. Furthermore, it is not really true that a web browser’s authorization is stateful. Because instead of an API client explicitly specifying authorization information in the request, a web browser does it for you. All this is caused by the stateless nature of the HTTP protocol. As a result most of well-known REST API’s are not really stateless. It depends which side you are on, client or server. Most of the time terms Stateless and Stateful refer to the server side. You may wonder what are benefits of stateless authentication. If no session information is stored by a server that makes it easier to scale your infrastructure, like adding more compute nodes (horizontal scaling). The problem is that session are stored on a single server, in addition sessions are commonly stored in memory. Therefore is becomes problematic to share them between several nodes.
Security layer
HTTP is nothing just but a plain text sent over the TCP. Today all APIs should built over HTTPS (at least), however this is not a silver bullet.
Cache data
Caching is a great way to boost up app clients’ performance, reduce server load and save bandwidth. There are a great variety of libraries for caching out there, that makes integration of caching mechanisms into existing applications and APIs almost transparent.
Idempotency
Idempotency is a fancy word that confuses a lot of people when they first meet it. In case of REST a call (method, service) is considered idempotent if it produces same results for multiple identical requests, without affecting the server’s state. The most common example is assigning a variable ( number = 300 ) and incrementing a variable by using the increment operator ( number++).
Back to REST API, the following methods are idempotent : GET, PUT, DELETE, HEAD, OPTIONS. And as you may’ve already guessed the POST are not idempotent. Finally, the PATCH method can be idempotent, but the specification states PATCH is neither safe nor idempotent.
The most important thing to understand here, if you call a DELETE endpoint multiple times, it will probably return different responses, at first 200 OK, followed by 404 NOT FOUND, but the final result will remain the same on a server. In other words, if you delete a resource all subsequent requests won’t delete the resource twice, affect other resources, recreate the deleted resource or anything else.
Safe methods
I have mentioned that the PATCH method is not safe. What does this mean ?
Safe methods do not change the state (representation) of a resource on a server or produce side-effects. The safe methods are : GET, HEAD and OPTIONS. This is very important concept because it makes possible to use caching, prefetching, proxifying, etc., resulting in things like CDN, Etags, the browser cache. However, you should always be cautious about using safe methods, hence there is a possible case when the Happens-Before problem may occur. A client will try to read a resource from the cache, but the resource is actually removed and then will try to modify it, therefore such cases should be handled correctly by a server.
But all above is true if you have implemented RESTFul API following all guidelines and specification, if you use GET method for deleting resources, sorry, thats your problem.
Here is the table with all methods and their properties.
| HTTP Method | Idempotent | Safe |
|---|---|---|
| GET | true | true |
| HEAD | true | true |
| OPTIONS | true | true |
| POST | false | false |
| PUT | true | false |
| DELETE | true | false |
| PATCH | false | false |
HATEOAS
HATEOAS stands for Hypermedia As The Engine Of Application State. The main idea is to provide navigation through resources provided by a REST API. Personally I have never used this idea in production. However, there are some cases when this can be useful. One of the goals of the HATEOS is to provide a way to navigate without hardcoding uris into client code. In addition a server can provide allowed/available actions for a resource, in this case it works like a state machine, being in some state there are only some allowed actions for execution. Even when HATEOS is used, a developer need to prepare an application’s architecture to work with links provided by a server. It gets even more harder to adapt mobile applications’ architecture to use hypermedia, and personally I don’t see any benefit to implement this idea in mobile applications. HATEOS is not used very extensively, but there are some well-known companies that integrated this idea in theirs API, like PayPal.
There are a lot of more good design practices, you can easily find a lot of discussions and interesting blog posts. And as usual it depends on the type of API you are going to implement, requirements and use cases.
API Security

An API can be a single point of failure and attack if it is not protected properly. In the Era of the Internet of Things a lot of APIs are exposed without any security. This can lead to far more serious problems than just data leakage. For instance, you have a Smart Home infrastructure and devices are communicating via some API (not necessarily a REST one). One day you decided to write an Android application for controlling your Smart Home system. As a result, you exposed the API, but didn’t secure it properly. There are a lot port scanners, bug scanners that are constantly scanning IP address spaces to find vulnerabilities, exposed ports, etc. In this case exposing an unsecured API can cause serious damage for your house, used by burglars and so on.
If it is a bank or a payment API, even more strict requirements are imposed. As a result n-factor authentication mechanisms should be introduced (usually two or three factor).
API Security topic is quite broad and requires a separate blog post or even two to describe it in details. As a consequence, I will explain only the most important and misunderstood terms.
RESTFul Authentication methods
There are several possible authentication methods available that can be applied to a REST API. Let’s have a quick glance at them.
HTTP Basic Authentication
The most weakest authentication method. Should not be considered to use in production environment. The only one use of it is simple auth over HTTPS or just a mechanism of preventing direct access to some resources.
Pros:- Really simple to implement.
- Can be used as the initial step to obtain token (over HTTPs only). For example OAuth 2 Password grant type.
- Sometimes is enough for basic security if used over HTTPS.
- Acceptable quick and dirty solution.
- Sent in a plain text “Authorization: Basic base64url(username + “:” + password)”.
- Not secure even used over HTTPS, as far there are possible vulnerabilities due to encryption methods.
There is another HTTP auth method called HTTP Digest Authentication. Credentials are not sent at all, this method leverages hashing algorithms to authenticate a client. But this method is still hackable via Man-in-the-middle attack.
What is a security Token ?
Before we go any further it is vital to understand what is Token and how it is used for authentication and how it differers from a password.
A token is just a piece of data(text) that identifies a request. Usually it is sent in the request headers as any other authentication data, like session and cookies (in case of the HTTP protocol). But it was designed with other ideas in mind.
For instance a token may be provided in the Authorization header as follows.
Bearer 0a4d55a8d778e5022fab701977c5d840bbc486d0
This is just an example of the authentication token. It doesn’t contain any information in it (honestly, this is just sha-1 hashed “Hello World” string). Consequently, all information should be still stored on the server side and that makes this type of authentication rather stateful than stateless.
Types of Tokens
There is a great number of different token types. You can even create your own. But I think all token types can be divided into two groups (taking into account stateless/stateful concepts) : self-contained tokens and opaque tokens. Let’s find out quickly how do they differ.
Opaque tokens (reference tokens)
This token type doesn’t contain any useful information that could be extracted from it by a server or a client, this is just a simple sequence of characters. This type is similar to session ids, resulting in extra information to be stored on a server. To get better idea, let’s have a look at the example of a possible table relation schema for storing tokens.
| id | access_token | refresh_token | user_id | scope | date_created | date_expiry |
|---|---|---|---|---|---|---|
| 323 | 0a4d55a8d778 | 726c0a4d5d72 | 32 | 1|3|5|6 | 1496336349 | 1496339949 |
This is just an example how the table may look like. Furthermore, even a client should persist some information except the token itself. Here is a example of the response from a OAuth 2 server.
1 2 3 4 5 6 | {
"access_token":"0a4d55a8d778",
"token_type":"bearer",
"expires_in":3600,
"refresh_token":"726c0a4d5d72"
}
|
As far as the token itself doesn’t contain any useful information every additional field should be stored by both parties in order to establish communication. Please note, we are not comparing authentication frameworks, but only token types instead. Now most of OAuth 2 server implementations support different token types.
I was pleasantly surprised when tried to find some examples of reference tokens used currently by authentication servers. Instead I was provided with the results that in some way point to the JWT token type. So let’s figure what is it.
JWT Token (self-contained tokens)
As defined in RFC7519 JSON Web Token (JWT) is a compact, URL-safe means of representing claims to be transferred between two parties.
First of all, a JWT token is a string as well, but crafted differently than opaque tokens, containing all necessary information directly itself.
If you are familiar with symmetric and asymmetric encryption, Public Key Infrastructure (PKI), certificates signing, it will be much easier to understand the concept of the JWT token.
As already mentioned all required information required to authenticate client is stored inside JWT token itself, let’s have a look what parts does a JWT token consist of.
A JWT token is divided into three main sections : header, payload and signature.
JWT Token Header
The header usually consists of two attributes : the token type and the algorithm used for signing and encrypting payload. The token type is JWT, as a result this attribute leaves the space for custom token types. There are two mainly used algorithms : HS256 and RS256. The former is a symmetric algorithm, therefore it requires only a secret key, the latter is asymmetric, hence you need a public and a private key. Let’s define a header object like that.
1 2 3 4 | {
"alg": "RS256",
"typ": "JWT"
}
|
JWT Token Payload (Claims)
The payload (claims) is the main part of the JWT token, as it contains information about a user, metadata about the token itself or any custom defined attributes. There are three main types of claims that can be inside payload : registered, public and private. You can find all Registered Claims in the IANA JWT Claims registry. In our case we define both registered and private claims.
1 2 3 4 5 6 7 8 9 10 11 12 13 | {
"iss": "jwt.crosp.net",
"iat": 1496430488,
"exp": 1499930488,
"sub": "[email protected]",
"scope" : "reader",
"ipAddr": "12.12.12.12",
"user": {
"id": "123",
"nickname": "chucknorris",
"fullName": "Norris Chuck"
}
}
|
JWT Token Signature
The signature is an essential part of the JWT token, that proves the token’s authenticity. This a way to ensure that the claims and the header part have not been compromised during transmission or even by a client.
In our case we are going to use the RS256 algorithm to sign the token, consequently we need to generate a private and a public key.
Public key:
1 2 3 4 | -----BEGIN PUBLIC KEY-----
MFswDQYJKoZIhvcNAQEBBQADSgAwRwJAeTIZfkPv1tcZ4x8f9mD83gtYrd5m6eAN
c0l4Kh82KnRLs5lQvVxtRJpIhlIXF+f4B0vZh/HcpnSGyYgFrMMRowIDAQAB
-----END PUBLIC KEY-----
|
Private key:
1 2 3 4 5 6 7 8 9 | -----BEGIN RSA PRIVATE KEY-----
MIIBOAIBAAJAeTIZfkPv1tcZ4x8f9mD83gtYrd5m6eANc0l4Kh82KnRLs5lQvVxt
RJpIhlIXF+f4B0vZh/HcpnSGyYgFrMMRowIDAQABAkA2M7/PBpc3IFBFkV/8EnhE
3hI1AGhKZJffXZZOUFMrPOYogiJLnigrqIp1jzFSrsSuHijQn6+PWRohTtmsSl7B
AiEAsDHhBUb3Bb9PD2j3gf99JJbgOIRiTCxGA10eTFtEQDMCIQCwFve7rpIXKt74
W7geQjftr7x2+l4249wne8bSdoK40QIgNBr8Fahv4uY5hjAfifU5V/m6Y1xbCXXK
WrJOBHy1CVsCIFP073MFvdPb9el2WafbrKzgADy+DNOg+qO8qURJivQxAiBSsYcF
M1f6mtQLYGPptTju70BQKmubKHK59FWXQE1Vxw==
-----END RSA PRIVATE KEY-----
|
JWT Token Putting all pieces together
Finally, we need to create a JWT token. The base format is defined as follows.
1 | header.payload.signature
|
Both the header and the payload should be Base64Url encoded. If you use data from this tutorial you should get the following results.
Header Base64Url encoded
1 | eyJ0eXAiOiJKV1QiLCJhbGciOiJSUzI1NiJ9
|
Payload Base64Url encoded
1 | eyJpc3MiOiJqd3QuY3Jvc3AubmV0IiwiaWF0IjoxNDk2NDMwNDg4LCJleHAiOjE0OTk5MzA0ODgsInN1YiI6InVzZXIxMjNAY3Jvc3AubmV0Iiwic2NvcGUiOiJyZWFkZXIiLCJ1c2VyIjp7ImlkIjoiMTIzIiwibmlja25hbWUiOiJjaHVja25vcnJpcyIsImZ1bGxOYW1lIjoiTm9ycmlzIENodWNrIn19
|
Eventually, create the signature using the next formula.
1 | RSASHA256(base64UrlEncode(header) + "." + base64UrlEncode(payload), public key, private key)
|
Signature
1 | LaksAMgBPucOgGB9n3mdQ_8cfbBkVer58AN85bQvhHE3mx8QDhh-HWF_W60S-tO5BF7CtyVaExhpWGTMTA8Vpg
|
As a final point our token will look like that:
1 | eyJhbGciOiJSUzI1NiIsInR5cCI6IkpXVCJ9.eyJpc3MiOiJqd3QuY3Jvc3AubmV0IiwiaWF0IjoxNDk2NDMwNDg4LCJleHAiOjE0OTk5MzA0ODgsInN1YiI6InVzZXIxMjNAY3Jvc3AubmV0Iiwic2NvcGUiOiJyZWFkZXIiLCJ1c2VyIjp7ImlkIjoiMTIzIiwibmlja25hbWUiOiJjaHVja25vcnJpcyIsImZ1bGxOYW1lIjoiTm9ycmlzIENodWNrIn19.LaksAMgBPucOgGB9n3mdQ_8cfbBkVer58AN85bQvhHE3mx8QDhh-HWF_W60S-tO5BF7CtyVaExhpWGTMTA8Vpg
|
In order to verify the generated token I recommend you online JWT Debugger tool, it will help you to understand creating of a token better.
Why cannot I change token claims ?
If you follow the described process of creating the token, you may notice that you can simply decode the payload(claims) part, see how it looks like in the JSON representation. But why cannot you change it ? Owing to the last signature step the whole token is signed, therefore as you don’t have a private key, you won’t be able to create a new signature.
The fact that token is signed, doesn’t make it publicly shareble, you must not expose it and in case it is leaked, the attacker may use it to get access claiming that he is the owner.
But you are free to provide some extra authentication information in order to prevent access even if a token was stolen. For example, you can set some unique ID or the IP address attribute inside payload.
1 2 3 4 5 6 7 8 9 10 11 12 13 | {
"iss": "jwt.crosp.net",
"iat": 1496430488,
"exp": 1499930488,
"sub": "[email protected]",
"scope" : "reader",
"ipAddr": "12.12.12.12",
"user": {
"id": "123",
"nickname": "chucknorris",
"fullName": "Norris Chuck"
}
}
|
Accordingly, if a request is made from another IP address, it will be rejected by a server. Of course this is not the best solution, but just an example to show how you can add an extra layer of security using JWT tokens.
The value of JWT tokens is that all information is provided inside a token itself and a server doesn’t need to store any data about sessions, as it can be extracted from a JWT token.
Conclusion
I this part I’ve tried briefly explain basic concepts of the REST API design, authentication methods and token types. I hope you found something useful in this article. This is just a theoretical part, in order to see Secure REST API implementation using NodeJS, checkout the second part.
Hi, my name is Molochko Alexander, I am Interested in different areas of software development, curious about learning and discussing architectural and software patterns, examining internals and understanding how everything works under the hood.
Recent posts
- Mar 1, 2020 Implementing Laravel custom Auth Guard and Provider
- Feb 16, 2019 Hacking Java Applications with Byte Buddy and Decompilers
- Jan 5, 2019 Page Specific Dynamic Angular Components using Child Routes
- Oct 13, 2018 Understanding Dagger 2 Scopes Under The Hood
- Jul 21, 2018 Understanding and using Xdebug with PHPStorm and Magento remotely
Popular posts
- 143560 Views How to Install The Latest Apache Server (httpd) on Centos 7
- 107563 Views Routing network traffic through a transparent SOCKS5 proxy using DD-WRT
- 76619 Views How to Unbrick TP-Link WiFi Router WR841ND using TFTP and Wireshark
- 75421 Views Android Reverse Engineering: Debugging Smali in Smalidea
- 62846 Views Clean Architecture : Part 2 – The Clean Architecture