TP-Link WiFi Router WR841ND is a very popular router because of it’s price, especially in my country. However this router is able to provide much more features than the stock firmware has. One day I decided to make it more powerful and feature-rich, furtermore I noticed message on the official tp-link page about possibility to install a custom firmware on your own risk. Therefore I decided to install the DD-WRT firmware. Here is one possible usage of DD-WRT firmware.
I flashed the firmware successfully and everything seemed to work, but than I recognized that I had to restore all settings (like port forwarding, mac addresses binding and so on) manually. Fortunately, I had backed up the config file. But this binary file is suitable only for the stock firmware. I had no time for exploring and parsing the binary file, so I decided to rollback in order save my settings in a plain text file and than flash the DD-WRT firmware again. I successfully rolled back, saved my settings, but while updating “web flash firmware” in the DD-WRT web gui, something went wrong and my router got bricked. The router started blinking all LEDS periodically, that is also known as the Boot Loop. The router’s internal interface went up and down periodically as well.
Is this the end?
Don’t worry if you bricked your router, there are a lot of ways to get it back to life. Some of the mostly used methods are:
- Communication over UART (TTL). In this case you need to disassemble your router, solder some wires to the pins on the routers motherboard and than you will be able to connect to the router over the UART interface. This is usually done with USB<->TTL converter.
- Using built-in TFTP auto-unbricker . Some routers have a built-in TFTP client running and looking for a TFTP server in the local network to download a firmware and debrick itself. This feature is usually provided by U-boot.
I could easily solder some wires and connect router over UART, but I really didn’t want to tear down my router, so I decided to use the second option.
Unbricking the router
All tutorials that you could find on the Internet suggest to use constant IP addresses like 192.168.0.68, generally it could be any address. It depends on a boot firmware flashed to your router. Therefore, you should try each IP address from the range from 192.168.0.2 to 192.168.0.68 until you find a proper one…. Furthermore, the router’s TFTP client will look for a file with some hardcoded name, that could be different for every firmware. Of course you shouldn’t try every possible combination, this article’s intention is to help you find exact parameters.
We will find out exact IP address and file name using network sniffer – Wireshark. Using Wireshark we can see everything that happens in our network, all packets going back and forth. Here are the steps to unbrick the router, that helped me.
- Download Wireshark from the official site and install it.
- Than run Wireshark select an Ethernet Adapter which you are going to use for connecting the router via a UTP cable.
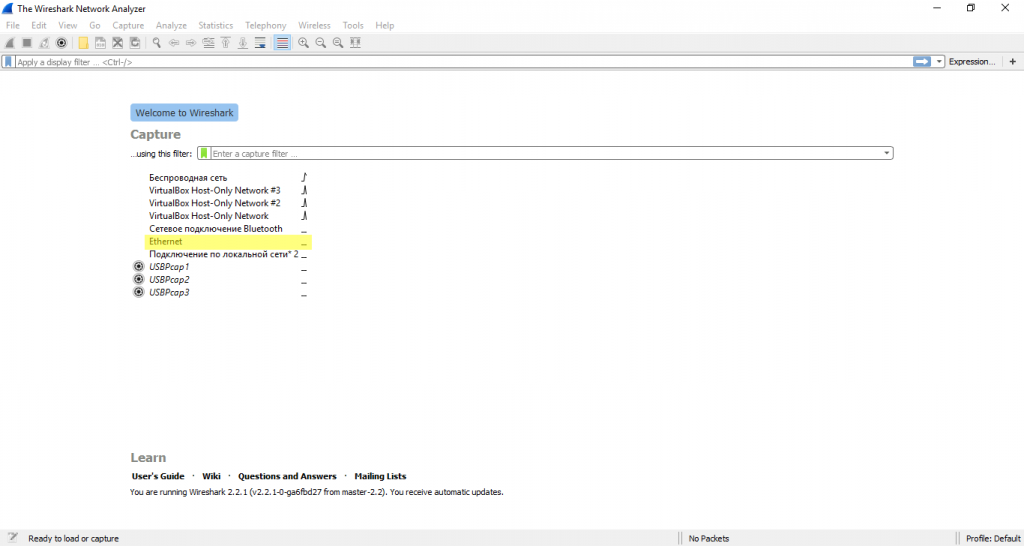
- You should see an empty log list at first.
- Now its time to connect your router. Connect the UTP cable one side to any LAN port (not WAN) on the router and other side should go to your PC or laptop.
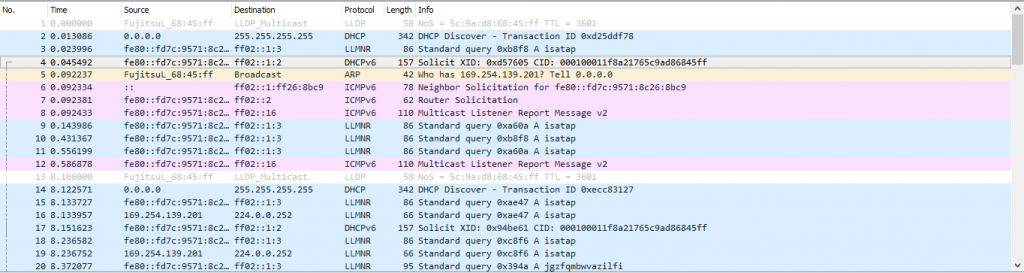
- Power on the router after the cable is connected. You should see packets appearing in the log list.
- Clear the log list in Wireshark. Power off your router. Than hold the WPS/Reset button and power it on. Keep holding the WPS/Reset button for some time(about 10 seconds).
- If you
are luckyhave done everything right you will see an ARP packet like that.1
19 1.389742 ba:be:fa:ce:08:41 Broadcast ARP 60 Who has 192.168.0.66? Tell 192.168.0.86
As you can see from the line above in my case the router is looking for 192.168.0.66.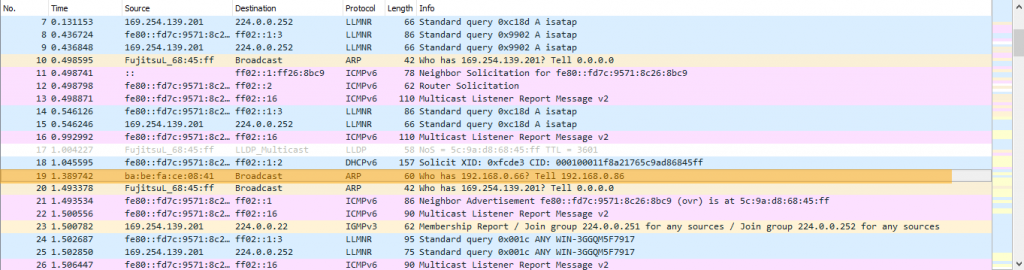
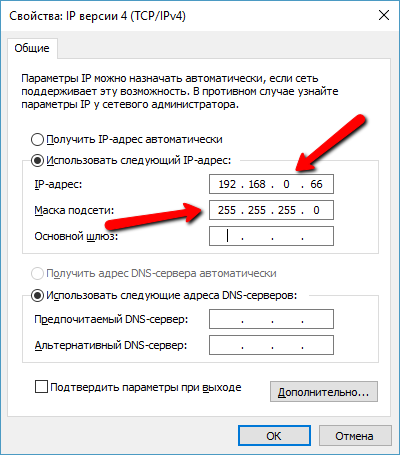
- Let’s configure our network interface to have the IP address that the router is looking for.
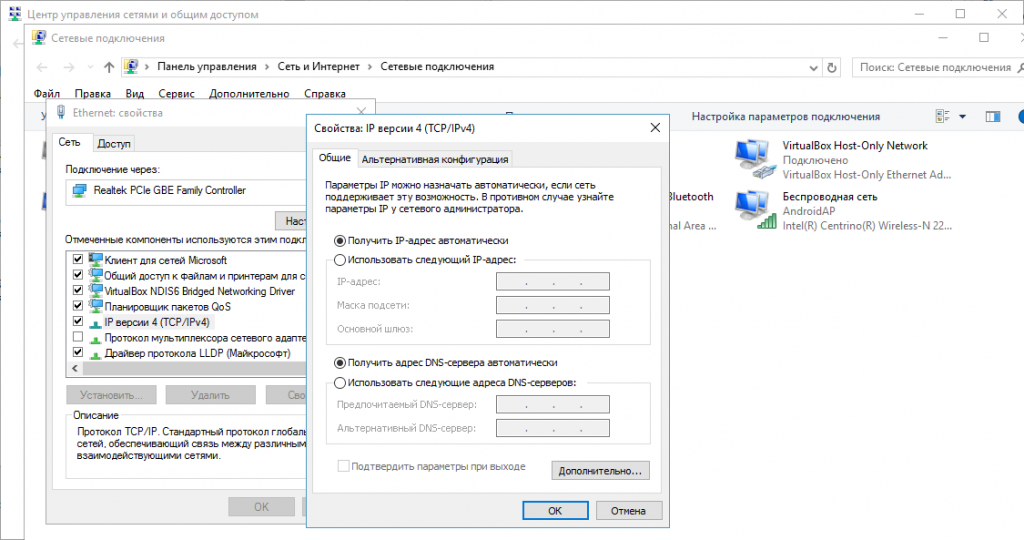
- Enter the IP address you got from the Wireshark and subnet mask 255.255.255.0.
Save settings.
- Finally, we need to find out what file name is the router looking for..
- Start Wireshark again. Power On the router holding the WPS/Reset button.
Wait for a few seconds, you will see the log list growing. Look for a TFTP packet (you can find it by sorting the protocol column). You should find something like that
1
159 7.304062 192.168.0.86 192.168.0.66 TFTP 85 Read Request, File: wr841nv8_tp_recovery.bin, Transfer type: octet, timeout=2
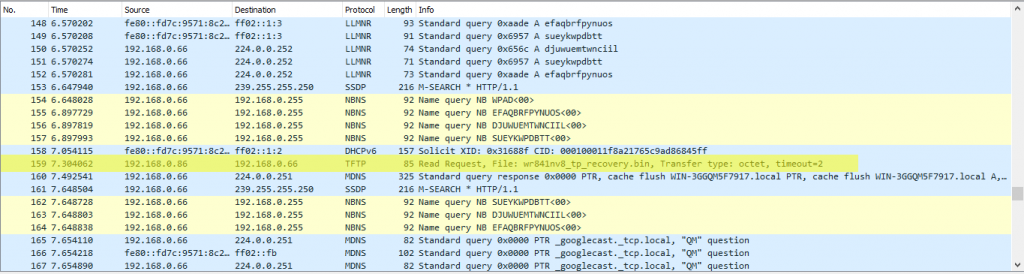
- This packet contains the file name the router is looking for. In this case it is wr841nv8_tp_recovery.bin. There’s a little left to do now.
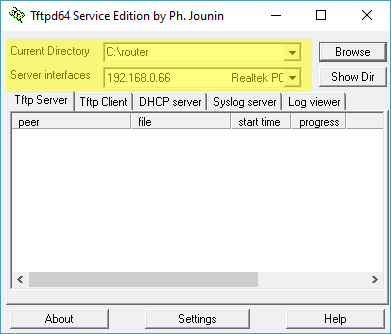
- Next download the TFTP server, for example that one and install it.
- Now you have to find a recovery file for your router. Go to download section and find Firmware WITOUT Boot section, usually this is stated in the file name or description. In my case I will use the OpenWRT firmware downloaded from https://downloads.openwrt.org/chaos_calmer/15.05/ar71xx/generic/ the file name is openwrt-15.05-ar71xx-generic-tl-wr841n-v8-squashfs-factory.bin
-
Rename the downloaded file to the value you got from TFTP packets, in my case it is wr841nv8_tp_recovery.bin in my case. Run TFTPd as administrator and select a proper IP address and directory where your firmware is located.
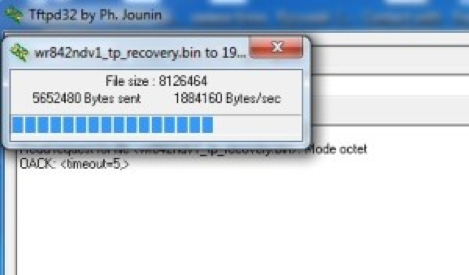
- Now power off the router. Connect it to you computer via the network cable. Hold the WPS/Reset button and power it on. Wait until a progress dialog appears. After that you will see progress in the TFTP Server Tab and wait until it completes. Do not power off the router give it some time to update firmware and boot up.
I have tried to do this on several PCs. Firstly on a Windows 10 laptop, an XP Laptop and the only machine that succeed to work was a Windows 7 desktop PC. It doesn’t depend on type of a computer, but mostly on software installed (especially firewalls and anti-viruses software). So if you have TFTP request from the router, but it doesn’t upload firmware (you don’t see the progress dialog) then try to use another PC. You can use any OS, a TFTP Server implementation is available for any OS (macOS, Linux, Windows).
- Finally reset your network adapter settings to Automatic or your previous settings. After that you should be able to access the router’s control Web UI as usual using browser (192.168.0.1).

Conclusion
In this article I’ve shared my experience of debricking my router. The main idea of the article is to show how the recovery process works under the hood and how can you find out the required IP address and file name, that your sick router is looking for. Hope this article help you to fix your router. If you have any questions, please feel free to leave them below in the comments section.
Hi, my name is Molochko Alexander, I am Interested in different areas of software development, curious about learning and discussing architectural and software patterns, examining internals and understanding how everything works under the hood.
Recent posts
- Mar 1, 2020 Implementing Laravel custom Auth Guard and Provider
- Feb 16, 2019 Hacking Java Applications with Byte Buddy and Decompilers
- Jan 5, 2019 Page Specific Dynamic Angular Components using Child Routes
- Oct 13, 2018 Understanding Dagger 2 Scopes Under The Hood
- Jul 21, 2018 Understanding and using Xdebug with PHPStorm and Magento remotely
Popular posts
- 139700 Views How to Install The Latest Apache Server (httpd) on Centos 7
- 101053 Views Routing network traffic through a transparent SOCKS5 proxy using DD-WRT
- 72334 Views How to Unbrick TP-Link WiFi Router WR841ND using TFTP and Wireshark
- 71665 Views Android Reverse Engineering: Debugging Smali in Smalidea
- 59137 Views Clean Architecture : Part 2 – The Clean Architecture