Redsocks is the tool that allows you to proxify(redirect) network traffic through a SOCKS4, SOCKS5 or HTTPs proxy server. It works on the lowest level, the kernel level (iptables). The other possible way is to use application level proxy, when the proxy client is implemented in the same language as an application is written in. Redsocks operates on the lowest system level, that’s why all running application don’t even have an idea that network traffic is sent through a proxy server, as a result it is called a transparent proxy redirector.
Prerequisites
If you are reading this article, you should probably have an idea why do you need to use a proxy server. Furthermore, you should be acquainted with basic proxy terms and definitions in order to understand everything described in this tutorial. It wouldn’t hurt to have some Linux administration skills as well.
For this tutorial I will be using Centos 7 Minimal installation, it has only the most essential applications installed. But you are free to use any distro, you may skip some steps then.
How does Redsocks work ?
Before start installing Redsocks, I think it is always worth to know how something works internally. And it will help to understand this tool better and therefore troubleshoot issues.
First of all, Redsocks leverages features provided by the Linux kernel firewall (Netfilter module)
I hope this diagram will help you to understand the flow of a packet while using Redsocks.
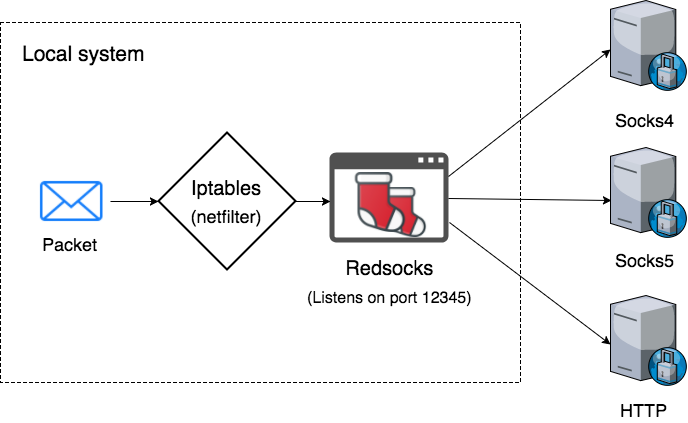
Here is a brief explanation how does a packet get redirected to Redsocks.
- When a packet is sent from an app in the system it is handled by the kernel, it triggers the NT_ hooks (defined in <linux/netfilter.h>).
- The ip_tables kernel module registers at netfilter’s hooks and proceed them according to defined rules.
- We are defining rules using the iptables command line utility (these rules will be described later in this article). And they are defined in the way that some or mostly all packets are redirected to the local process listening on a port, 12345 in case of Redsocks.
- All redirected packets are handled by Redsokcs conforming to the configuration file rules.
- Redsocks redirects packets to proxy servers.
Step 1 — Getting Redsocks source code
First and foremost, you need to update repositories and installed software on the system.
1 | yum update
|
In order to install Redsocks we need to compile it at first. Change into a directory you want to keep source code in.
1 | cd /opt/
|
By default the git command line tool is not installed in most Centos distros. So install it at first.
1 | yum install git
|
And clone Redsocks source code from the git repository.
1 | git clone https://github.com/darkk/redsocks
|
Now change the directory to the redsocks.
1 | cd redsocks/
|
Try to compile the application, but it will probably fail. In my case I don’t have even make installed.
1 2 3 | [root@centos7 redsocks]# make
-bash: make: command not found
[root@centos7 redsocks]#
|
Step 2 — Compiling Redsocks
Firstly you need to install build-tools(Development Tools) if you haven’t already.
1 | yum group install "Development Tools"
|
Next, we need to install dependencies to successfully compile Redsocks.
1 | yum install libevent libevent-devel
|
After installation try to compile Redsocks again using the make command. If compilation succeed you should see the compiled binary file in the current directory.
1 2 | [root@centos7 redsocks]# ls -l redsocks
-rwxr-xr-x 1 root root 415968 Jul 7 08:49 redsocks
|
Now you can copy the binary file to any folder defined in the $PATH variable, to be able to execute it without specifying a full path to Redsocks.
Step 3 — Setting Iptables Rules
To redirect necessary packets to Redsocks we need to define some iptables rules. I will use the rules suggested on the official Redsocks page.
1 2 | # Create new chain
iptables -t nat -N REDSOCKS
|
The rule above creates a new custom chain in the NAT table.
Next we need to exclude all local and reserved network addresses. As a result all packets with the destination address from the following ranges will not be sent to Redsocks.
1 2 3 4 5 6 7 8 9 | # Exclude local and reserved addresses
iptables -t nat -A REDSOCKS -d 0.0.0.0/8 -j RETURN
iptables -t nat -A REDSOCKS -d 10.0.0.0/8 -j RETURN
iptables -t nat -A REDSOCKS -d 127.0.0.0/8 -j RETURN
iptables -t nat -A REDSOCKS -d 169.254.0.0/16 -j RETURN
iptables -t nat -A REDSOCKS -d 172.16.0.0/12 -j RETURN
iptables -t nat -A REDSOCKS -d 192.168.0.0/16 -j RETURN
iptables -t nat -A REDSOCKS -d 224.0.0.0/4 -j RETURN
iptables -t nat -A REDSOCKS -d 240.0.0.0/4 -j RETURN
|
Now we need to add a rule that will redirect all packets from our custom REDSOCKS chain to the local port, we will use the default one – 12345
1 | iptables -t nat -A REDSOCKS -p tcp -j REDIRECT --to-ports 12345
|
Please note, this rule doesn’t redirect every packet sent in the system to the port 12345, it only redirects packets that are already passed inside the REDSOCKS chain. You can check this, for example using the following command.
1 | wget google.com
|
Consequently, we need to define a rule that will redirect chosen packets by some criteria to the REDSOCKS chain. You are free to apply any rules you want, but I will show how to redirect all HTTP and HTTPS packets through a proxy. Define the following rules.
1 2 3 | # Redirect all HTTP and HTTPS outgoing packets through Redsocks
iptables -t nat -A OUTPUT -p tcp --dport 443 -j REDSOCKS
iptables -t nat -A OUTPUT -p tcp --dport 80 -j REDSOCKS
|
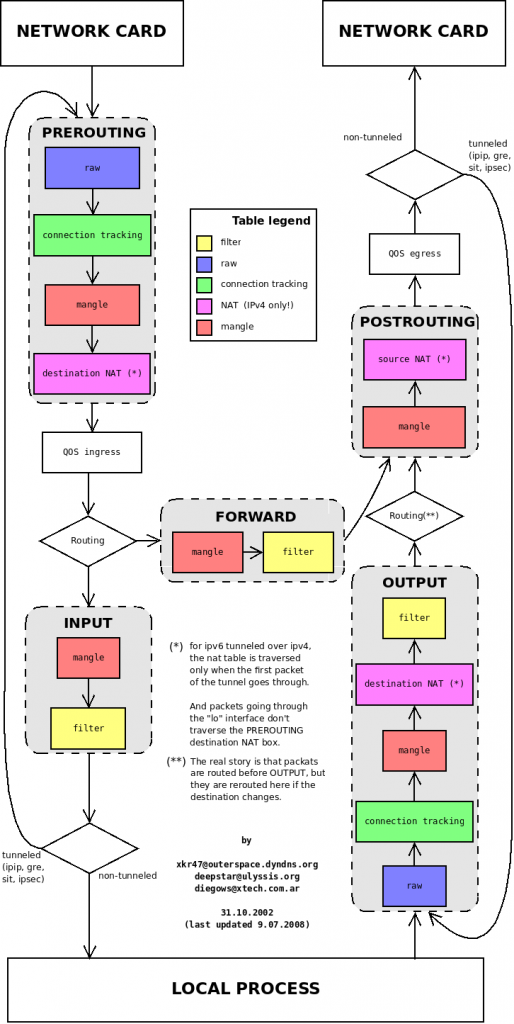
Also you may need to define the following rules in the PREROUTING chain. For redirecting incomming packets to the REDSOCKS chain.
1 2 3 | iptables -t nat -A PREROUTING -p tcp --dport 443 -j REDSOCKS
iptables -t nat -A PREROUTING -p tcp --dport 80 -j REDSOCKS
iptables -t nat -A PREROUTING -p tcp --dport 1080 -j REDSOCKS
|
Do not be confused about these rules. They are applied only for incoming packets, that’s why the chain is called PRE ROUTING. Here is the diagram that shows the packet flow through iptables tables and chains.
Furthermore, you are free to define any rules you need, just remember to jump (-j REDSOCKS) to the REDSOCKS chain. Here another example from the official documentation. It redirects only packets sent from a specific user, this could be very useful in some cases. You can follow the user per application strategy (similar used in Android), as a result you will be able set application specific rules.
1 | iptables -t nat -A OUTPUT -p tcp -m owner --uid-owner crosp -j REDSOCKS
|
One more important point, avoid using the root user in iptables rules or you may get stuck in the infinite loop. Here is a problem I’ve encountered because of my inattention.
Having set iptables rules the final step is to configure Redsocks itself using the configuration file.
Step 4 — Configuring Redsocks
Create a file with the name redsocks.conf in the same directory (or any other directory) where the binary file is located. And let’s start by defining the base section of the configuration file as follows.
1 2 3 4 5 6 7 | base {
log_debug = on;
log_info = on;
log = "stderr";
daemon = off;
redirector = iptables;
}
|
I think each parameter is self-explanatory. You can find a complete description of every option in the example of configuration file in the official repository.
Next we need to define proxies. This is done using redsocks sections. Here is an example of a possible proxy configuration.
1 2 3 4 5 6 7 8 9 10 11 12 13 14 15 16 17 | redsocks {
// Local IP listen to
local_ip = 127.0.0.1;
// Port to listen to
local_port = 12345;
// Remote proxy address
ip = super.socks.proxy.com;
port = 9966;
// Proxy type
type = socks5;
// Username to authorize on proxy server
login = anonymous;
// Password for a proxy user
password = verystrongpassword;
// Do not disclose real IP
disclose_src = false;
}
|
As you can see from the configuration above, this is the SOCKS5 proxy configuration. Redsocks will listen to the port 12345. We have provided credentials to authenticate ourselves on the proxy server as well.
You create multiple redsocks sections. But you have to specify a different local port and as a result you need to set appropriate iptables rules.
1 2 3 4 5 6 7 8 9 10 11 12 13 14 15 16 17 | redsocks {
// Local IP listen to
local_ip = 127.0.0.1;
// Port to listen to
local_port = 83333;
// Remote proxy address
ip = puper.socks.proxy.com;
port = 6699;
// Proxy type
type = socks5;
// Username to authorize on proxy server
login = anonymous2;
// Password for a proxy user
password = verystrongpassword;
// Do not disclose real IP
disclose_src = false;
}
|
As an example, you can use the tricky technique to simulate load balancing with the help of the random module.
1 2 | iptables -t nat -A REDSOCKS -p tcp -m random --mode random --probability 0.5 -j REDIRECT --to-ports 83333
iptables -t nat -A REDSOCKS -p tcp -j REDIRECT --to-ports 12345
|
There are lot of other ways to define iptables rules for using with multiple proxies, for instance you can use the mangle table, create another chain (ex. REDSOCKS_HTTP) and so on.
Step 5 — Testing proxies with Redsocks
Now it is time to test our configuration. Save the configuration file. Navigate to the folder with the Redsocks compiled executable file. And execute the following command.
1 | ./redsocks -c /etc/redsocks.conf
|
If your configuration file is valid and there are no other errors you should almost return immediately in case or running in the daemon mode or see the similar output with the daemon mode off.
1 | 1499876514.801445 notice main.c:165 main(...) redsocks started, conn_max=128
|
Furthermore, you can use the netstat tool to get list of processes bound to ports.
1 2 3 4 5 6 7 8 9 10 | [root@centos ~]# netstat -tulpn
Active Internet connections (only servers)
Proto Recv-Q Send-Q Local Address Foreign Address State PID/Program name
tcp 0 0 127.0.0.1:27017 0.0.0.0:* LISTEN 533/mongod
tcp 0 0 0.0.0.0:22 0.0.0.0:* LISTEN 50/sshd
tcp 0 0 127.0.0.1:12345 0.0.0.0:* LISTEN 465/./redsocks
tcp6 0 0 :::22 :::* LISTEN 50/sshd
udp 0 0 0.0.0.0:14332 0.0.0.0:* 229/dhclient
udp 0 0 0.0.0.0:68 0.0.0.0:* 229/dhclient
udp6 0 0 :::28185 :::* 229/dhclient
|
Now try to make any request as the specified user or to match a rule you defined on your own. For example, use the following curl request to get your external IP address.
1 | curl 'https://api.ipify.org?format=json'
|
If the redsocks process is attached to the terminal, you should see something like that in stderr.
1 2 3 | 1499882494.465788 info redsocks.c:1243 redsocks_accept_client(...) [192.168.0.128:34470->50.19.238.1:443]: accepted
1499882495.249026 debug redsocks.c:341 redsocks_start_relay(...) [192.168.0.128:34470->50.19.238.1:443]: data relaying started
1499882496.359465 info redsocks.c:671 redsocks_drop_client(...) [192.168.0.128:34470->50.19.238.1:443]: connection closed
|
If you encountered any error check debug output in the first place.
Conclusion
In this tutorial I’ve described how to install Redsocks on Centos 7. Redsocks provides a very convenient way to configure a proxy environment, starting from a single proxy server to a dozens of proxies of different type. In addition if you are missing some features in the original project, you can check out a fork – Redsocks2.
I hope this tutorial was useful for you. If you have any troubles with setting up Redsocks, please feel free to leave comments below.
Hi, my name is Molochko Alexander, I am Interested in different areas of software development, curious about learning and discussing architectural and software patterns, examining internals and understanding how everything works under the hood.
Recent posts
- Mar 1, 2020 Implementing Laravel custom Auth Guard and Provider
- Feb 16, 2019 Hacking Java Applications with Byte Buddy and Decompilers
- Jan 5, 2019 Page Specific Dynamic Angular Components using Child Routes
- Oct 13, 2018 Understanding Dagger 2 Scopes Under The Hood
- Jul 21, 2018 Understanding and using Xdebug with PHPStorm and Magento remotely
Popular posts
- 142996 Views How to Install The Latest Apache Server (httpd) on Centos 7
- 104960 Views Routing network traffic through a transparent SOCKS5 proxy using DD-WRT
- 76330 Views How to Unbrick TP-Link WiFi Router WR841ND using TFTP and Wireshark
- 74994 Views Android Reverse Engineering: Debugging Smali in Smalidea
- 62541 Views Clean Architecture : Part 2 – The Clean Architecture